Any links to online stores should be assumed to be affiliates. The company or PR agency provides all or most review samples. They have no control over my content, and I provide my honest opinion.
Following on from my DNS server guide, this guide aims to help you change your DNS settings on your various devices.
To save you some time, you can skip to the device you want with the contents menu on the right-hand column (for desktop users) or just below this paragraph.
Why Should You Assign Static DNS Server Settings?
Assigning static DNS server settings is the practice of manually entering specific DNS server addresses rather than relying on the ones automatically provided by the Internet Service Provider (ISP) or network. Here’s when you might consider using static DNS server settings:
- Improved Performance: Some DNS servers are known for their fast response times, which can translate into a slightly faster browsing experience. If the default DNS servers provided by the ISP are slow or unreliable, you may choose to manually set a faster DNS server like Google’s (8.8.8.8) or Cloudflare’s (1.1.1.1).
- Ad Blocking: Some advanced DNS servers allow you to apply blocklists, which will then block adverts and trackers.
- Content Filtering: Some DNS servers offer content filtering options, allowing you to block certain types of content, such as adult sites or known malicious domains. This can be particularly useful in educational or family environments.
- Enhanced Security and Privacy: DNS servers like Cloudflare’s 1.1.1.1 or Quad9 (9.9.9.9) offer security features like DNS-over-HTTPS (DoH) or DNS-over-TLS (DoT) that encrypt your DNS queries. This adds an extra layer of privacy and security by preventing eavesdropping and manipulation of DNS data by man-in-the-middle attacks.
- Avoiding ISP Tracking: If you have concerns about your ISP tracking your browsing habits through DNS queries, using a third-party DNS server might alleviate those concerns.
- Network Control: In business or managed IT environments, setting a static DNS server can allow more control over network traffic, compliance with company policies, and integration with internal resources.
- Reliability: If your default ISP’s DNS servers are known to have downtime or connectivity issues, manually setting a more reliable DNS server can help maintain a more stable internet connection.
- Compatibility with Specific Services: Some services or applications might recommend specific DNS settings for optimal performance and compatibility.
How to Change Router DNS Settings?
If you have decided to use a new DNS server, then changing the DNS configuration settings on your router is normally the best option. This will make all the devices on your network use that DNS server (unless you have manually assigned a DNS server to that device).
General Steps
I have tried to write brand-specific guides below, but all routers will share some steps, such as logging in. Rather than repeat this for each guide, these are the general steps you will want to take:
- Connect to Your Network: Make sure your computer or device is connected to the Netgear router’s network.
- Access the Router’s Web Interface: Open a web browser and enter the router’s IP address. Most routers use https://192.168.1.1 or https://192.168.0.1 or https://192.168.1.254. Press Enter.
- Log In: You’ll be prompted to enter your username and password. The default username is usually admin, and the default password is often password. If you’ve changed these, use your custom credentials. Many routers nowadays (such as Netgear or ISP-supplied routers) come with a predefined password that you can find on the router itself.
When you have changed the DNS settings, you may want to restart the router (I rarely bother) and you should always check to make sure everything is working as you’d like.
If you are using an advanced DNS service such as NextDNS and AdGuard, or a self hosting DNS server such as Pi-Hole, then you can log into these and check to see if they are registering queries.
How to Change DNS on Netgear Routers?
Changing the DNS settings on a Netgear router allows you to use alternative Domain Name Servers, which might offer improved speed, security, or other benefits. Here’s a step-by-step guide to help you modify the DNS settings on a Netgear router:
- Navigate to DNS Settings:
- Click on the “Advanced” tab.
- Select “Setup” from the menu on the left-hand side.
- Click on “Internet Setup.”
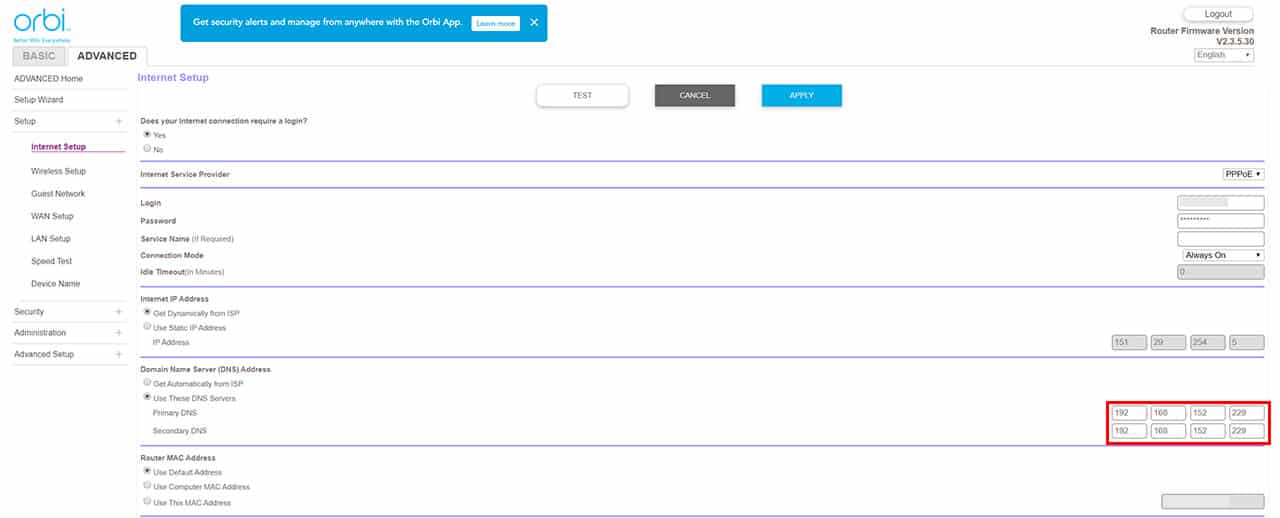
- Modify DNS Settings:
- Scroll down to the “Domain Name Server (DNS) Address” section.
- Choose “Use These DNS Servers.”
- Enter the preferred and alternate DNS addresses you’d like to use. For example, for Google’s DNS, you might enter 8.8.8.8 as the preferred DNS server and 8.8.4.4 as the alternate.
- Save Changes: Scroll down and click the “Apply” or “Save” button to confirm the new settings. The router may need a moment to apply the changes.
How to change DNS on ASUS routers?
- Navigate to WAN Settings:
- Click on the “WAN” option on the left-hand navigation menu.
- You’ll find it under the “Advanced Settings” section.
- Modify DNS Settings:
- Scroll down to the “WAN DNS Setting” section.
- Uncheck “Connect to DNS Server automatically.”
- Enter the desired DNS addresses in the “DNS Server1” and “DNS Server2” fields.
- If desired, a third DNS server can be entered in the “DNS Server3” field.
- Save Changes: Click the “Apply” button at the bottom of the page. Your router may take a moment to apply the new settings.
How to change DNS on TP-Link routers?
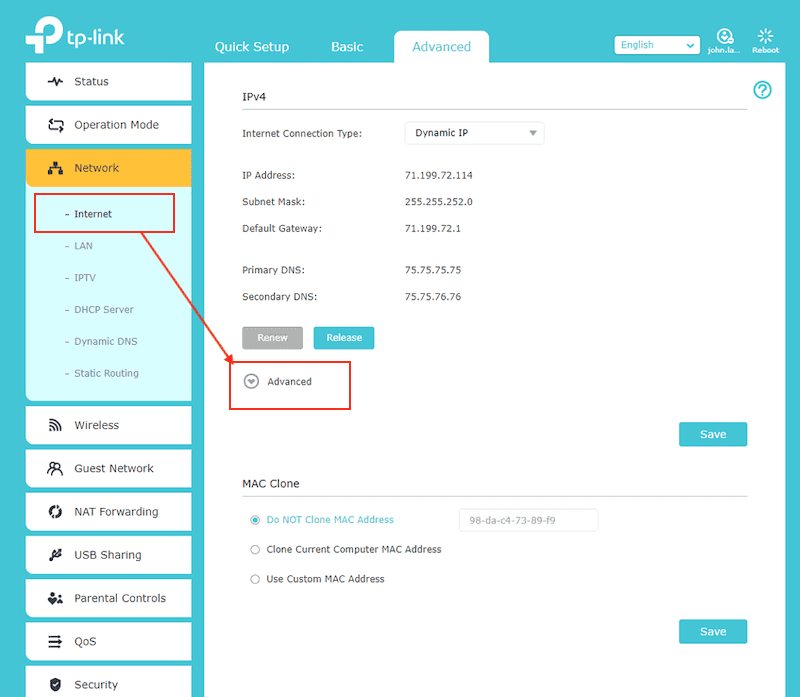
- Navigate to DNS Settings:
- Click on the “Network” tab, usually found on the left-hand side or top navigation menu.
- Select “WAN” from the dropdown or navigation options.
- Modify DNS Settings:
- Locate the “Primary DNS” and “Secondary DNS” fields.
- Enter the desired DNS addresses.
- Make sure to uncheck or select the option that disables obtaining the DNS automatically from your ISP, if available.
- Save Changes: Click the “Save” or “Apply” button, usually located at the bottom of the page. Your router may need a moment to apply the new settings.
How to Change DNS Settings on Your Computer?
Changing the DNS settings on your PC will mean that it is only the PC that uses that DNS. This can be useful if you want the features from a specific DNS server without forcing all the other devices to use it.
How to change DNS on Windows 10 / 11?
Windows 10
- Open Control Panel: Right-click on the Start button and select “Control Panel.”
- Access Network Settings: Click on “Network and Sharing Center” > “Change adapter settings.”
- Choose the Connection: Right-click on the connection you want to configure (either Wi-Fi or Ethernet) and select “Properties.”
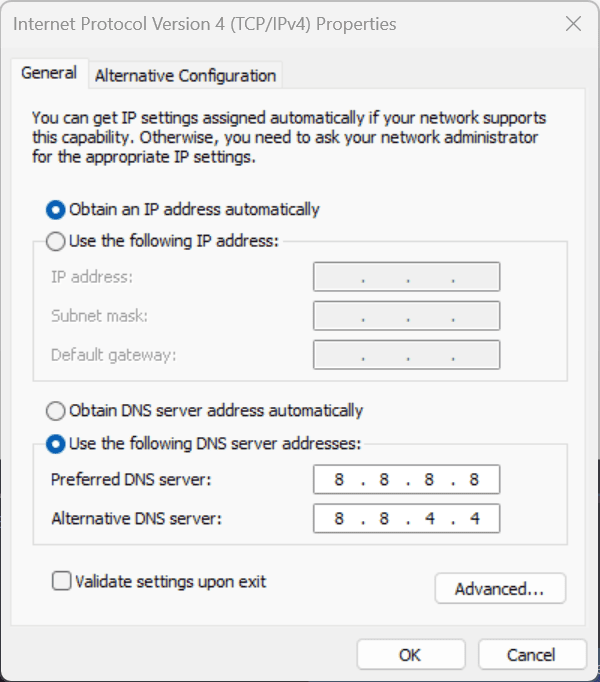
- Navigate to TCP/IP Settings: Highlight “Internet Protocol Version 4 (TCP/IPv4)” and click on “Properties.”
- Modify DNS Settings:
- Select “Use the following DNS server addresses.”
- Enter the desired DNS addresses in the “Preferred DNS server” and “Alternate DNS server” fields (e.g., Google’s DNS: 8.8.8.8 and 8.8.4.4).
- Save Changes: Click “OK” > “Close.” You may want to restart your network connection to ensure changes take effect.
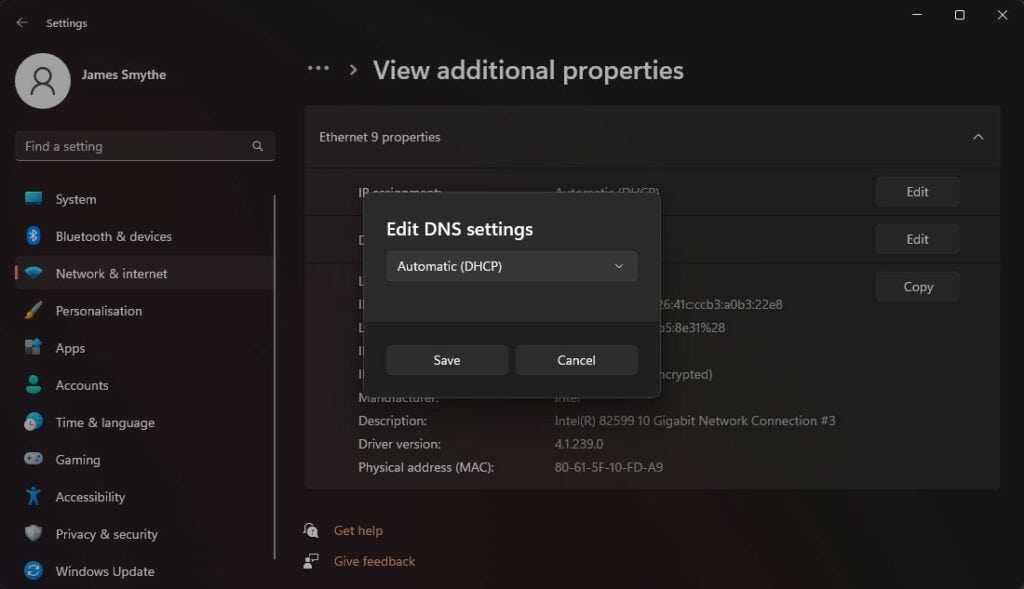
Windows 11
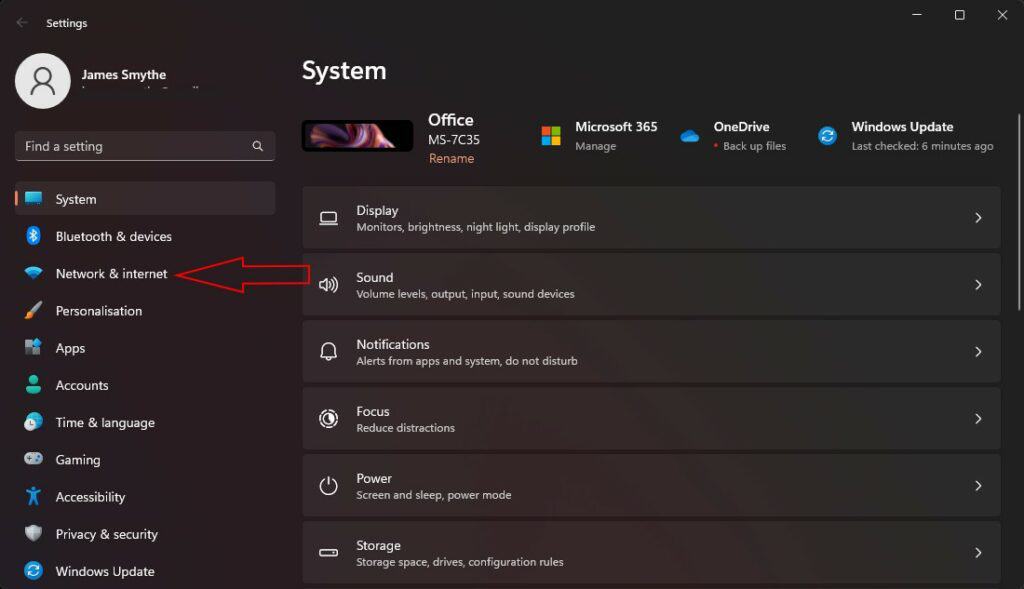
- Open Settings: Right-click on the Start button and select “Settings,” or press WIN + I.
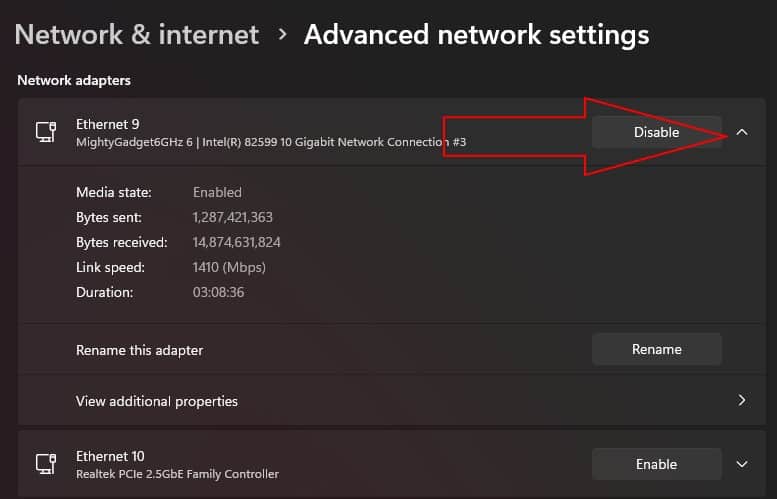
- Access Network Settings: Click on “Network & Internet” > “Advanced network settings.”
- Choose the Connection: Choose the network adaptor settings you want to change and click the little sideways arrow to expand, then select additional properties
- Navigate to TCP/IP Settings: Right-click on the connection you want to configure (either Wi-Fi or Ethernet) and select “Properties.” Highlight “Internet Protocol Version 4 (TCP/IPv4)” and click on “Properties.”
- Modify DNS Settings:
- Select “Use the following DNS server addresses.”
- Enter the desired DNS addresses in the “Preferred DNS server” and “Alternate DNS server” fields.
- Save Changes: Click “OK” > “Close.” Restarting the network connection may help the changes take effect more quickly.
How to change DNS on Mac?
Changing the DNS settings on a Mac can be done quite easily through the system preferences. Here’s a step-by-step guide to help you modify the DNS settings:
- Click on the Apple Menu: Located at the top left corner of the screen, then select “System Preferences.”
- Open Network Preferences: Click on “Network” to access your network settings.
- Select the Connection: Choose the network connection you want to modify (such as Wi-Fi or Ethernet) from the list on the left-hand side.
- Access Advanced Settings: Click the “Advanced” button located towards the bottom right of the window.
- Navigate to the DNS Tab: Click on the “DNS” tab to see the current DNS settings.
- Add or Change DNS Servers:
- Click the “+” button located below the DNS Servers box.
- Enter the desired DNS server address (e.g., Google’s DNS: 8.8.8.8).
- Repeat the process to add an alternate DNS server if needed (e.g., Google’s alternate DNS: 8.8.4.4).
- Reorder DNS Servers (Optional): If you want to prioritize the new DNS servers, drag them to the top of the list in the DNS Servers box.
- Save Changes: Click the “OK” button, then “Apply.”
- Restart Your Connection (Optional): Turning Wi-Fi off and back on or unplugging and replugging the Ethernet cable can help the new settings take effect.
Use A DNS App
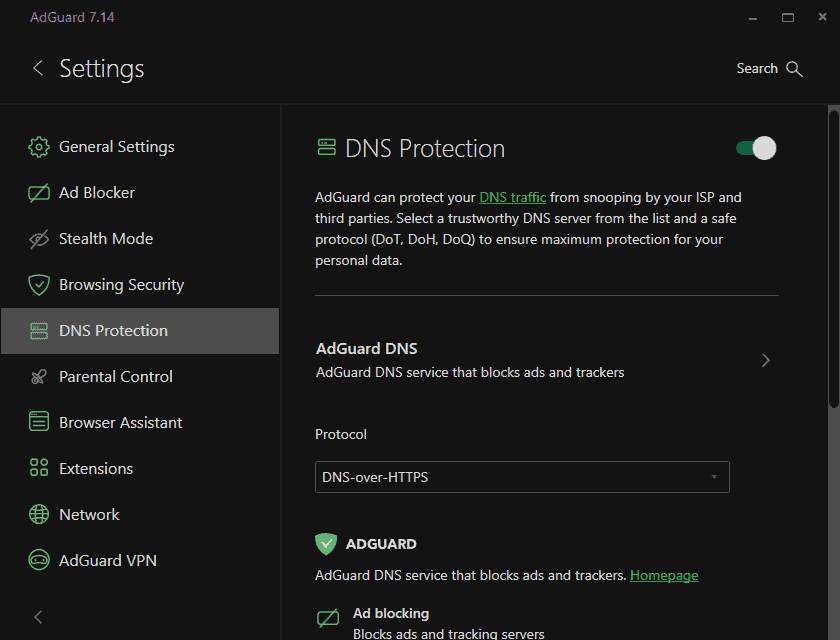
If you have decided to use a premium DNS server, they will often have dedicated apps that change the DNS settings for you. The benefit of these apps is that they will normally use advanced DNS technologies such as DNS-over-HTTPS, which provides superior privacy by encrypting DNS queries within HTTPS. They will also often allow the DNS server to identify which device is connecting to the server rather than all the requests coming from your router.
I know that NextDNS, Adguard and Cloudflare Warp all have their own dedicated apps.
How do you Change NAS DNS Settings?
Similar to the PC settings, changing the DNS settings on your NAS may be useful if you want to be able to see device-specific statistics from your chosen NAS. Or perhaps you want specific features enabled for the NAS.
In general, most people would want to set up a NAS as a DNS server itself, which is a popular feature on Synology NAS devices. That’s a bit more specialist, and I will write a guide on that another time.
How do you Change Synology NAS DNS Settings?
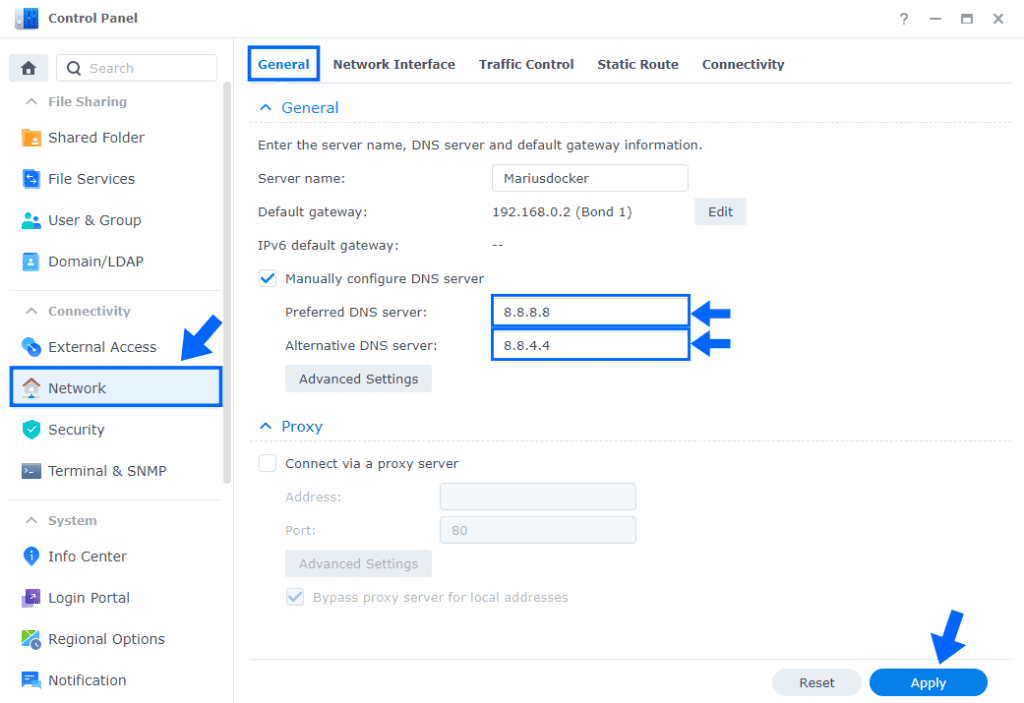
- Log In to Synology DSM: Open a web browser and access the DiskStation Manager (DSM) by entering the IP address of your Synology NAS. Log in using your username and password.
- Open Control Panel: Once logged in, click on the “Control Panel” icon in the main menu.
- Access Network Settings: Inside the Control Panel, click on the “Network” icon.
- Navigate to General Tab: In the Network window, click on the “General” tab.
- Choose DNS Configuration:
- You will see options for the preferred and alternate DNS servers.
- Enter the desired DNS addresses in the “Preferred DNS server” and “Alternate DNS server” fields (e.g., Google’s DNS: 8.8.8.8 and 8.8.4.4).
- Apply Changes: Click the “Apply” button to save the new settings. Your Synology NAS may take a moment to apply these changes.
How do you Change TerraMaster NAS DNS Settings?
- Log In to TerraMaster TOS: Open a web browser and enter the IP address of your TerraMaster NAS to access the TOS (TerraMaster Operating System). Log in using your username and password.
- Access Control Panel: Once logged in, click on the “Control Panel” or similar option in the main menu.
- Navigate to Network Settings: Look for a section labeled “Network” or “Network Settings” within the Control Panel.
- Open Network Interface: You may find an option called “Network Interface” or “LAN Settings.” Click on it.
- Select the Connection: Choose the network connection you want to configure if there’s more than one.
- Modify DNS Settings:
- Locate the “DNS Server” or similar section.
- Enter the desired DNS addresses in the appropriate fields (e.g., Primary DNS: 8.8.8.8, Secondary DNS: 8.8.4.4).
- Apply Changes: Click the “Apply,” “Save,” or “OK” button to confirm the new settings. The TerraMaster NAS may require a moment to apply the changes.
How do you Change QNAP NAS DNS Settings?
- Log In to QNAP QTS: Open a web browser, enter the IP address of your QNAP NAS or use Qfinder Pro to access the QTS (QNAP Operating System). Log in using your administrator username and password.
- Access Control Panel: Once logged in, click on the “Control Panel” in the main menu.
- Navigate to Network & File Services: Inside the Control Panel, click on the “Network & File Services” option, then select “Network & Virtual Switch.”
- Select the Network Interface: Choose the network connection (such as Adapter 1 or Ethernet) you want to configure.
- Open TCP/IP Settings: Click on the “Edit” or “Configure” button, and a window with TCP/IP settings should appear.
- Modify DNS Settings:
- Locate the DNS section within this window.
- Select “Manually configure DNS server.”
- Enter the desired DNS addresses in the “Primary DNS server” and “Secondary DNS server” fields (e.g., Google’s DNS: 8.8.8.8 and 8.8.4.4).
- Apply Changes: Click the “Apply” or “OK” button to confirm the new settings. Your QNAP NAS may take a moment to apply these changes.
How do you Change Unraid NAS DNS Settings?
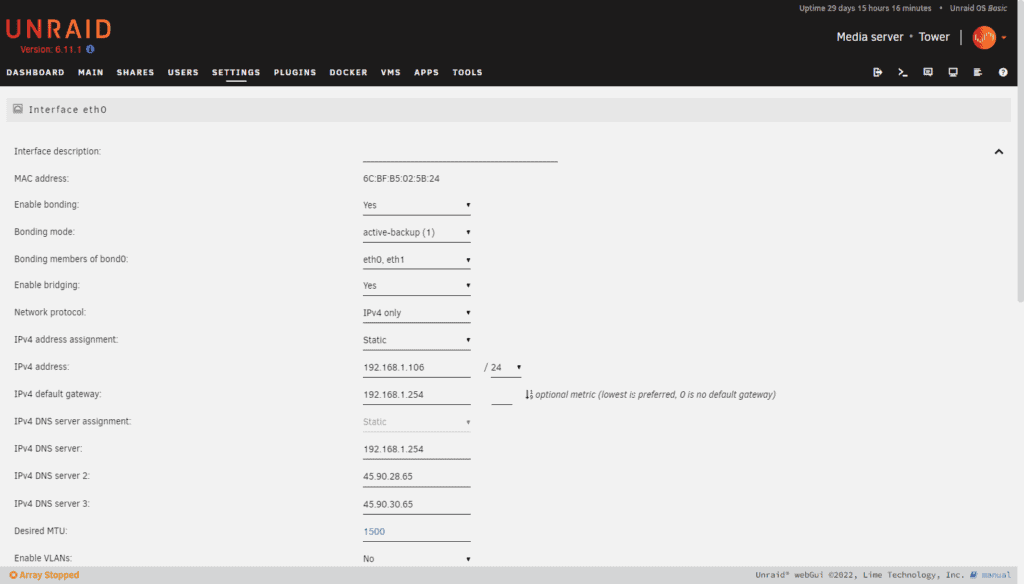
- Access Unraid Web Interface: Open a web browser on a device connected to the same network as the Unraid server, then enter the Unraid server’s IP address or hostname to access the web interface.
- Log In: If prompted, enter your username and password to log in.
- Stop VM manager and Docker Service: You need to stop the VM manager and Docker service before you can make network changes. I typically stop the array via Main, then Stop
- Navigate to Network Settings: Click on the “Settings” tab in the top menu, then select “Network Settings” from the dropdown.
- Locate DNS Settings: Scroll down to the “DNS Server” section. Here you will find fields for entering DNS addresses.
- Enter DNS Addresses:
- Enter the desired DNS server address in the “DNS Server 1” field (e.g., Google’s DNS: 8.8.8.8).
- Optionally, you can add a secondary DNS server in the “DNS Server 2” field (e.g., Google’s alternate DNS: 8.8.4.4).
- Apply Changes: Scroll down to the bottom of the page and click the “Apply” button. Your Unraid server may prompt you to restart the network services or the entire server.
- Restart Array: Go back into main and restart the disk array.
How do you Change Private DNS Settings on Android?
For Android, you can sometimes define the DNS server for specific WiFi connections. However, assuming you want to use an advanced DNS service, there is the Private DNS function.
Starting with Android 9 (Pie), Android devices have a feature called “Private DNS,” which allows you to set a specific DNS server for all your network connections, including mobile data. Here’s how you can configure Private DNS:
- Open Network & Internet Settings: Go to the Settings app on your Android device, then tap “Network & Internet.”
- Access Advanced Settings: Tap on “Advanced” to reveal more options.
- Find Private DNS Option: Scroll down until you see the “Private DNS” option and tap on it.
- Choose Configuration Mode: You will be presented with three options:
- Off: This will disable the Private DNS feature.
- Automatic: This will allow Android to use DNS-over-TLS with compatible servers automatically.
- Private DNS Provider Hostname: This allows you to manually enter a hostname of a DNS provider that supports DNS-over-TLS (e.g., dns.google for Google’s DNS-over-TLS service).
- Enter Hostname (if Manual): If you choose to manually configure the Private DNS, you’ll need to enter the hostname of your preferred DNS provider that supports DNS-over-TLS. After entering the hostname, tap “Save” or simply navigate back.
- Check the Connection: If you entered a hostname, your device will attempt to connect using the provided DNS server. If there’s an issue, you’ll see a notification stating that the Private DNS server is unreachable.
- Revert if Necessary: If you encounter any issues or want to revert to the default settings, simply follow the steps above and choose either the “Off” or “Automatic” option.
How do you Change DNS Settings on iPhone?
Apple iOS doesn’t provide a built-in setting specifically for configuring private DNS across the system, but you can configure DNS settings for individual Wi-Fi networks or use a VPN service that supports custom DNS.
To Change DNS Settings for a Wi-Fi Network:
- Open Settings: Tap the Settings app on your iPhone.
- Tap Wi-Fi: Select the Wi-Fi network you are connected to or want to configure.
- Tap the Information Icon: It’s a blue “i” icon next to the network you want to modify.
- Change DNS Settings:
- Tap the “Configure DNS” option.
- Select “Manual.”
- Delete any existing entries and then tap “Add Server.”
- Enter the desired DNS addresses (e.g., for Google’s DNS, 8.8.8.8 and 8.8.4.4).
- Save Changes: Tap “Save” to apply the changes.
This change only affects the specific Wi-Fi network you’ve configured. When connecting to other networks, you’ll need to configure the DNS settings for each one separately.
For a network-wide change, you’d be best off downloading a specific DNS app. Cloudflare Warp and NextDNS both have dedicated apps that will run all DNS requests regardless of the network you are on through their specialist DNS servers.
I am James, a UK-based tech enthusiast and the Editor and Owner of Mighty Gadget, which I’ve proudly run since 2007. Passionate about all things technology, my expertise spans from computers and networking to mobile, wearables, and smart home devices.
As a fitness fanatic who loves running and cycling, I also have a keen interest in fitness-related technology, and I take every opportunity to cover this niche on my blog. My diverse interests allow me to bring a unique perspective to tech blogging, merging lifestyle, fitness, and the latest tech trends.
In my academic pursuits, I earned a BSc in Information Systems Design from UCLAN, before advancing my learning with a Master’s Degree in Computing. This advanced study also included Cisco CCNA accreditation, further demonstrating my commitment to understanding and staying ahead of the technology curve.
I’m proud to share that Vuelio has consistently ranked Mighty Gadget as one of the top technology blogs in the UK. With my dedication to technology and drive to share my insights, I aim to continue providing my readers with engaging and informative content.