Best Helium hotspot antenna for indoors or easy outdoor install with no drilling – Window & loft installation
I have previously written about Helium hotspot antennas multiple times in the past. All of these have been geared towards users installing them outside and as high up as possible. This is by far the best way to improve your Helium Hotspot earnings.
However, I appreciate this is not always a practical solution. I recently got my hands on a couple of new Helium hotspots, and it is not exactly easy convincing hosts to have holes drilled through their external walls. Similarly, people living in flats are probably not allowed to drill big holes in external walls.
So, what are the best options to maximise your HNT earnings using easy techniques that require no drilling?


External mounting with through window cabling
This has been my go-to method when installing a hotspot at a hosts house. You can eliminate the need for drilling.
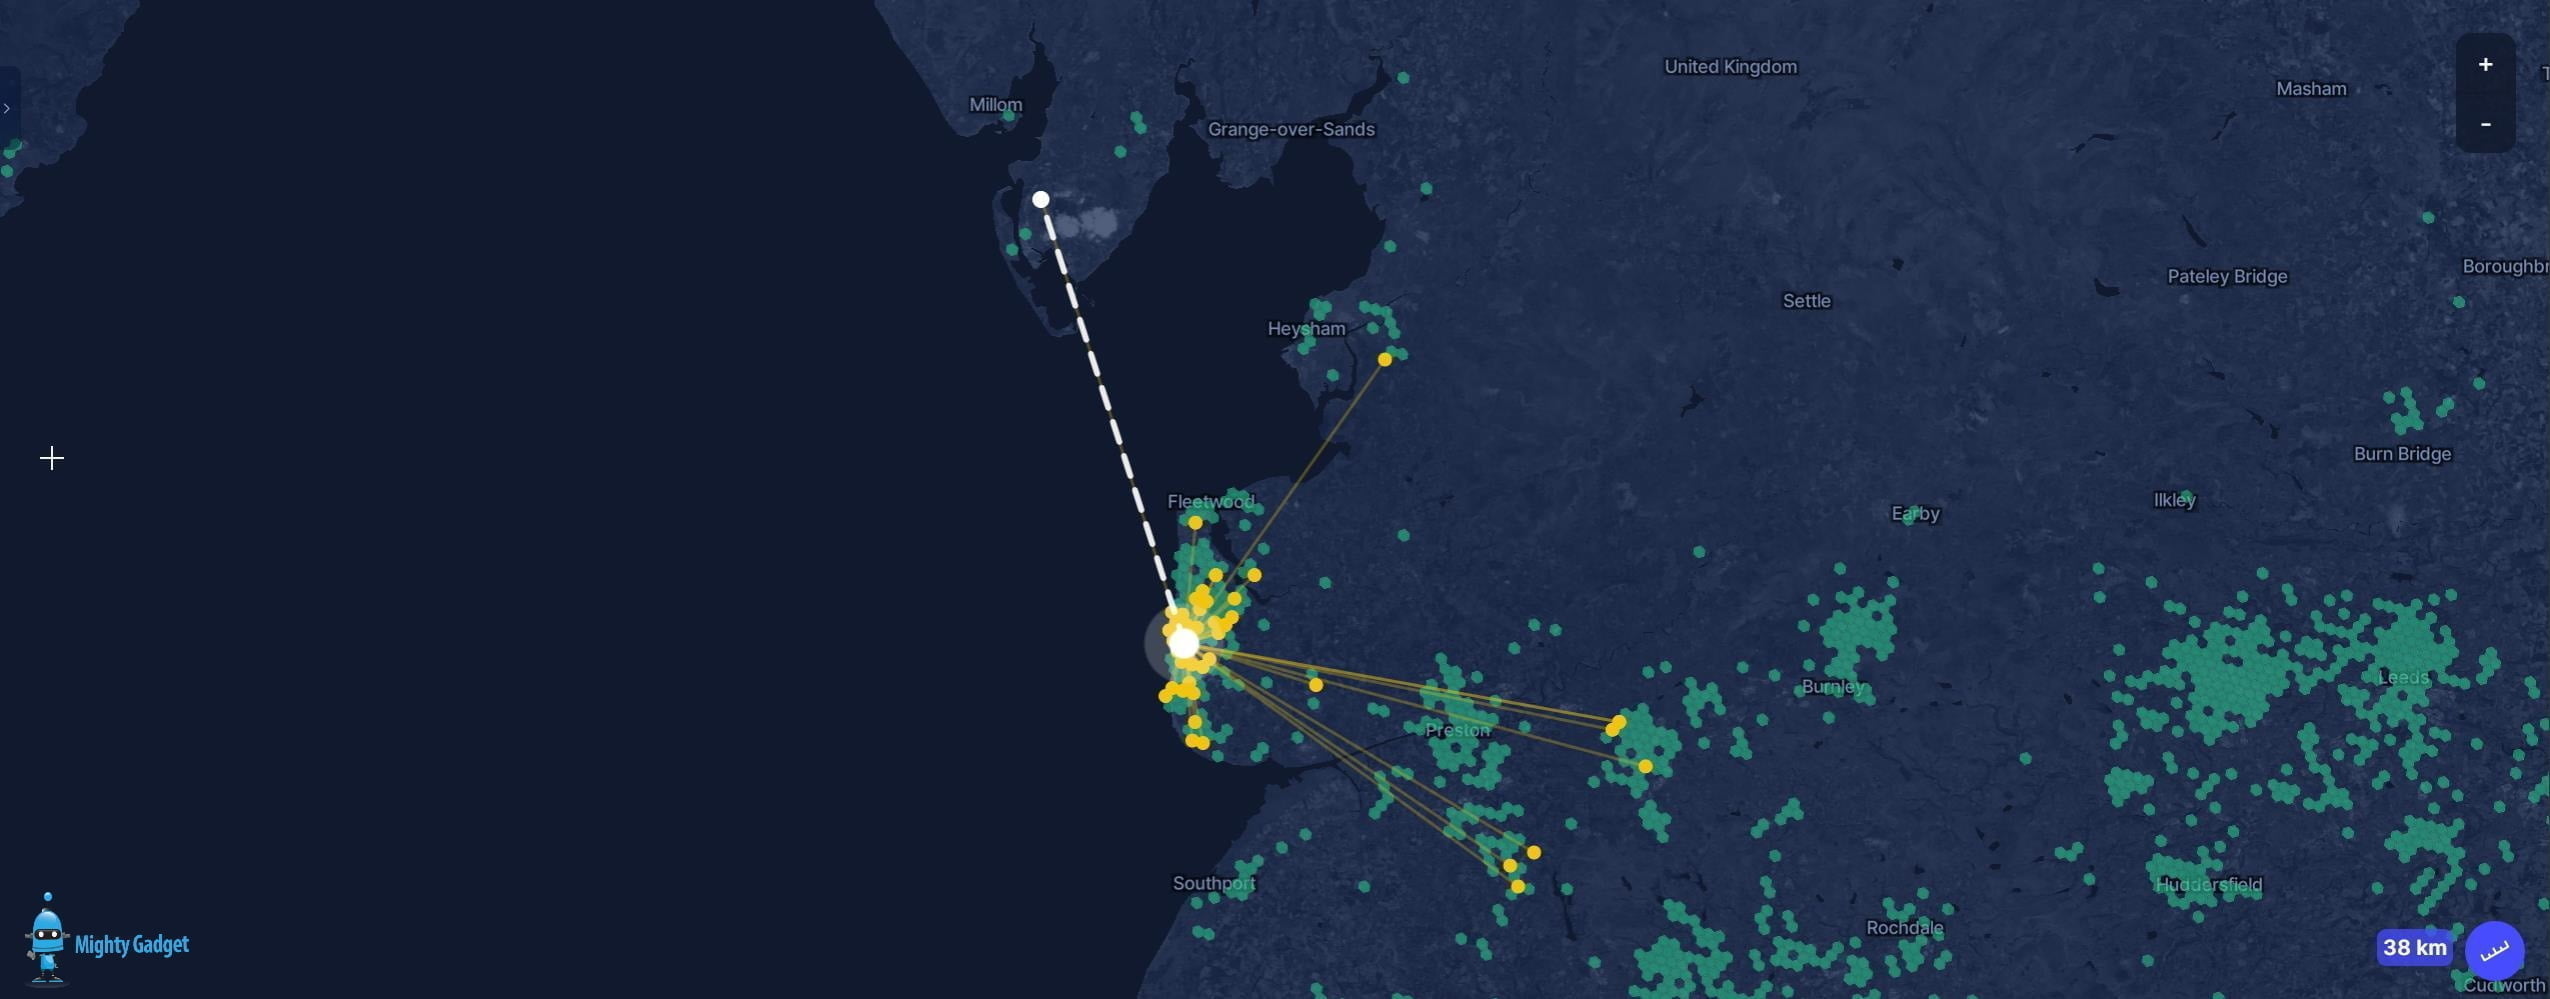
You will need to locate it on your top floor, and if possible, I would try and choose a window that you know is facing towards a lot of hotspots. For example, I live on the coast, picking a window facing the sea may not be an ideal location. Obviously, the antenna works in 360, but your house is going to block the signal getting through to hotspots.
Normally when you buy an antenna, they through in a short cable, I have found this works perfectly well as a through window cable. You could upgrade it with the options I have listed from McGill Microwave further down.
Because the cable is short, your hotspot will need to be on the window sill. You can use WiFi, or you could use POE, which I have covered under the lost installation below.
I am cheap, so I have been using these stick-on antenna mounts for both indoors and outdoors. I haven’t had one fail yet, but I did use some outdoor gorilla table to reinforce the adhesion on one exposed installation.
Alternative options are the McGill Microwave window mount. It is expensive, and they still recommend a backup securing.
For your antenna, the recommendation is pretty much the same for most installations.
5.8/6dbi antennas are generally the go-to option offering excellent all-round performance with a long-range but also capturing hotspots close by.
If there are a lot of hotspots nearby, you can use a 3dbi or 4.5dbi antenna. You will be able to use the included short cable with these, and this has a minimal signal loss, so you will get the most out of your antenna in this scenario.
With this solution, I mount the antenna on the window, but you can always upgrade to a chimney mounted antenna at a later date then connect the thick LMR-600 cable to the short through window cable.
Indoor Mounting – Window vs Loft
Indoor mounting is always going to cause some issues as the signal needs to get through a physical barrier. A window will most likely provide the least resistance, but a loft could be a superior solution, and it might even be better than an external window mount.
Loft Installation

If you live in an old house like mine, the roof is uninsulated; mine isn’t even lined. Many users are reporting that this scenario allows them to achieve good results. While the signal has to get through the thick tiles, you will have the benefit of high up 360 coverage.
If you have a warm room where the roof is insulated, you may not have much success. This is especially true if foil-wrapped insulation has been used.
If you have no power in the loft, the easiest solution will likely be using power over Ethernet, you will need a POE adaptor for the router end, then a POE splitter for the hotspot end.
There is a variety of thin Ethernet cables which should allow you to route the cable into the loft somewhere.
Window Installation
An internal window installation is your last resort, but it is very easy to do. It works exactly the same as the external window mount, you just don’t wire anything through your window.
I use this cheap window mount for antenna, and it has served me well, indoors and out. McGill Microwave sells an indoor suction mount. Alternatively, Nebra and some other sites ell a magnetic base that you can screw the antennas in.
Make your own outdoor Helium Hotspot
I haven’t done this yet, and if you do this, don’t blame me if anything goes wrong. A popular option with some of the Helium community is to convert your indoor hotspot to an outdoor one. This will technically be the best overall solution as it will allow you to locate the hotspot as high as possible while also using a short antenna cable.
It appears to be popular in the US, and their main concern is the hotspot overheating. This is less of a concern in the UK, certainly up North where I live.
Our concern is the lower temperatures. The indoor units are rated for 0-60 degrees. With it being winter, we will likely often have many sub-zero evenings.
If you do explore any of the following ideas, I’d suggest trying to locate the housing in a sheltered position I am not entirely confident IP rated enclosures will handle our horizontal rain indefinitely. Under your soffits is probably a good idea, it will reduce exposure to the sun and the rain.
Possible solutions are:
Nebra IP67 Enclosure
- The Nebra IP67 case is available to buy and is rated for -60C to +230C. It is a heat trap, and in direct sun, it will add an additional +6.5 Celsius, which is probably not a problem in the UK. If you do use this case, you would need to remove the internals of the hotpot and remount them into the case.
- You will also need a mounting board and POE switch HAT
- You can also buy a backup battery HAT
Random IP rated enclosures

There are plenty of cheap external enclosures you can find on Amazon to ham-fist your own outdoor system, but these are uninsulated, and I am not confident enough in this solution that I’d risk my nearly impossible to buy helium hotspot.
Things you will need/should consider
- IP rated enclosure big enough to fit your hotspot + holes to run cables (or you will have to drill your own
- POE adaptor and POE splitter – The splitter goes in the case to provide wired Ethernet, and then the power
- It is worth considering a USB-C power delivery battery pack
- Outdoor POE surge protector – Lightning isn’t a huge issue in the UK, but having your hotspot fried by a surge would be upsetting.
- It is possible to buy low powered anti-condensation heaters – how to power this is beyond my current comprehension
One option I came across while researching this, and I am not recommending it, but it might work. You can buy quite cheap IP rated foam-padded equipment cases on ebay and Amazon. I have absolutely no idea how you’d mount it, and you’d also need to create holes for the antenna and Ethernet, but there is some potential here.
Antenna Recommendation
This section is a copy and paste of what I have already written, but just to clarify.
As far as I am aware, the antenna recommendations would stay the same indoors or out.
I have used the Paradar 868Mhz LoRa antenna 4.5dbi on my recent installations and this has performed well for me.
5.8/6dbi antennas are generally the go-to option offering excellent all-round performance with a long-range but also capturing hotspots close by.
If there are a lot of hotspots nearby, you can use a 3dbi or 4.5dbi antenna. You will be able to use the included short cable with these, and this has a minimal signal loss, so you will get the most out of your antenna in this scenario.
Cable Recommendation
LMR-600 cable provides the least loss, but it is extremely thick and expensive; this is suited for roof installations where you may have 10m of cable.
LMR-400 cable is good for medium length cable. However, it is too thick to get through a window and close it. For my house, I managed to squeeze through the Helium Hotspot SMA end of the antenna through an old coaxial hole that was used for Sky TV.
The short cable that gets supplied with most antennas will just about fit under a window, just close it very carefully, ideally not too tight. I have used this cable to then connect to either LMR-600 or LMR-400.
McGill Microwave sells a 1m ultra-low loss LMR-100 which is quite expensive at £29.49 EX VAT. I have not used it, so I can’t say if it will offer much benefit.
They also sell some ultra-thin and flat cables, but these use SMA connectors rather than N-Female/Male
Amazon sells quite a few LMR-240 cables. These should be acceptable for short-range, under 3m. However, I doubt you’d be able to close a window on them.

I am James, a UK-based tech enthusiast and the Editor and Owner of Mighty Gadget, which I’ve proudly run since 2007. Passionate about all things technology, my expertise spans from computers and networking to mobile, wearables, and smart home devices.
As a fitness fanatic who loves running and cycling, I also have a keen interest in fitness-related technology, and I take every opportunity to cover this niche on my blog. My diverse interests allow me to bring a unique perspective to tech blogging, merging lifestyle, fitness, and the latest tech trends.
In my academic pursuits, I earned a BSc in Information Systems Design from UCLAN, before advancing my learning with a Master’s Degree in Computing.
I’m proud to share that Vuelio has consistently ranked Mighty Gadget as one of the top technology blogs in the UK. With my dedication to technology and drive to share my insights, I aim to continue providing my readers with engaging and informative content.
I work directly with the companies he reviews products for or their chosen PR agency.
For Social Media, you can find me on:

![Kingston Fury Beast 3600Mhz DDR4 Review [KF436C18BBK2/32] – Rebadged HyperX but fantastic value for money](https://mightygadget.com/wp-content/uploads/2026/04/Kingston-Fury-Beast-768x449.jpg)