Aqara Spatial Multi Sensor FP400 Review
Aqara has released the Spatial Multi-Sensor FP400, a camera-free presence sensor that uses 60GHz mmWave radar to track where people are in a room rather than simply whether a room is occupied. It is available now in the UK for £79.99 and sits alongside the existing Presence Sensor FP2 in Aqara’s line-up.
The main change compared with the FP2 is connectivity. The FP2 relies on 2.4GHz Wi-Fi, while the FP400 supports both Thread and Zigbee, with Matter support for use across the major smart home platforms.


Specification
| Model | PS-S05E / PS-S05D |
| Dimensions | 64 x 64 x 29.5 mm |
| Power Input | 5V 1A |
| Ports | USB-C |
| Wireless Protocols | Thread, Zigbee |
| Protection Rating | IPX5 |
| Operating Temperature | -10°C to 50°C |
| Operating Humidity | 0 to 95% RH, no condensation |
| What is in the Box (Amazon Version) | Spatial Multi-Sensor FP400 x 1, User Manual x 1, USB-C to USB-C Cable x 1, Metal Plate x 1, Sticker x 1, Screw Kit x 1 |
| What is in the Box (Brand Retail Version) | Spatial Multi-Sensor FP400 x 1, Bracket x 1, User Manual x 1, USB-C to USB-C Cable x 1, Metal Plate x 1, Sticker x 1, Screw Kit x 1 |
Features
The Aqara Spatial Multi-Sensor FP400 uses a 60GHz mmWave radar with a 4T4R antenna array. Unlike a basic motion sensor, it tracks where people are in a room. It can follow up to 10 people at once and give a live headcount, which is double the five-person limit of the FP2. Positioning works on a 0.5 x 0.5 m grid, and as there is no camera, no images are captured.
You can set up to eight zones, so automations can react to where someone is rather than just whether the room is occupied. For example, the lights can follow you from the sofa to the dining table. AI-assisted mapping detects room boundaries and entrances during setup. Aqara’s AI Spatial Learning is designed to reduce false triggers from pets, moving air and robot vacuums. There are also three sensitivity levels, an adjustable absence timer and a built-in ambient light sensor.
Coverage and Installation
When wall mounted, a single sensor covers up to 10 x 8 m with a 120° field of view. Corner mounting covers 7 x 7 m, and ceiling mounting at 3 to 4 m covers 5 x 6 m for motion and 4 x 5 m for presence. The sensor measures 64 x 64 x 29.5 mm and needs USB-C power (5V 1A), so there is no battery option. The Amazon version does not include the mounting bracket.
Connectivity
The FP400 swaps the FP2’s Wi-Fi for Zigbee and Matter over Thread, and control is local. It works with Alexa, Apple Home, Google Home, Home Assistant, Homey and SmartThings. You can add it to the Aqara Home app without an Aqara hub if you already have a Thread Border Router, though using Zigbee with a third-party Matter platform requires an Aqara hub.
The main limitation is that over Thread, third-party platforms only see one overall presence sensor and one light sensor. Zones and headcount stay within the Aqara app, so you will need to use Aqara’s ecosystem to get the most out of it.
This applies when the sensor is added directly to a Matter platform without being configured first. If you set up zones in the Aqara app beforehand, a Thread connection can expose the whole-area sensor plus up to eight zone sensors, which I cover in more detail in the integration section below.
Aqara Spatial Multi Sensor FP400 vs Presence Sensor FP300 vs Presence Sensor FP2
| Specification | Aqara Presence Sensor FP400 | Aqara Presence Sensor FP300 | Aqara Presence Sensor FP2 |
| Sensing technology | 60 GHz mmWave, claimed 5x greater precision | 60 GHz mmWave + PIR | 60 GHz mmWave |
| Connectivity | Thread / Zigbee 3.0 | Thread / Zigbee 3.0 | Wi-Fi + Bluetooth Low Energy |
| Detection | Motion and presence | Motion and presence | Motion and presence |
| Target tracking | Up to 10 targets | No | Up to 5 targets |
| Detection zones | 8 zones, 0.5 m grid | No | 30 zones, 0.5 m grid |
| Detection angle | 120° horizontal / 100° vertical | 120° | 120° horizontal / 40° vertical |
| Detection coverage / range | 10 x 8 m | 6 m | 8 x 6 m |
| Ambient light sensing | Yes | Yes | Yes |
| Temperature and humidity sensing | Not specified | Yes | Not specified |
| Water resistance | IPX5 | Not specified | IPX5 |
| Power supply / battery life | USB-C power | 3-year battery life | USB-C power |
| Magnetic stand | Yes | Yes | Yes |
The other differences worth knowing about are features the FP400 has dropped. The FP2 offers fall detection and sleep monitoring, and neither is available on the FP400. The FP2 also allows up to 30 zones compared with eight here. For most rooms, eight zones will be plenty, but if you rely on fall detection or sleep monitoring, the FP2 remains the better choice.
Unboxing / Design
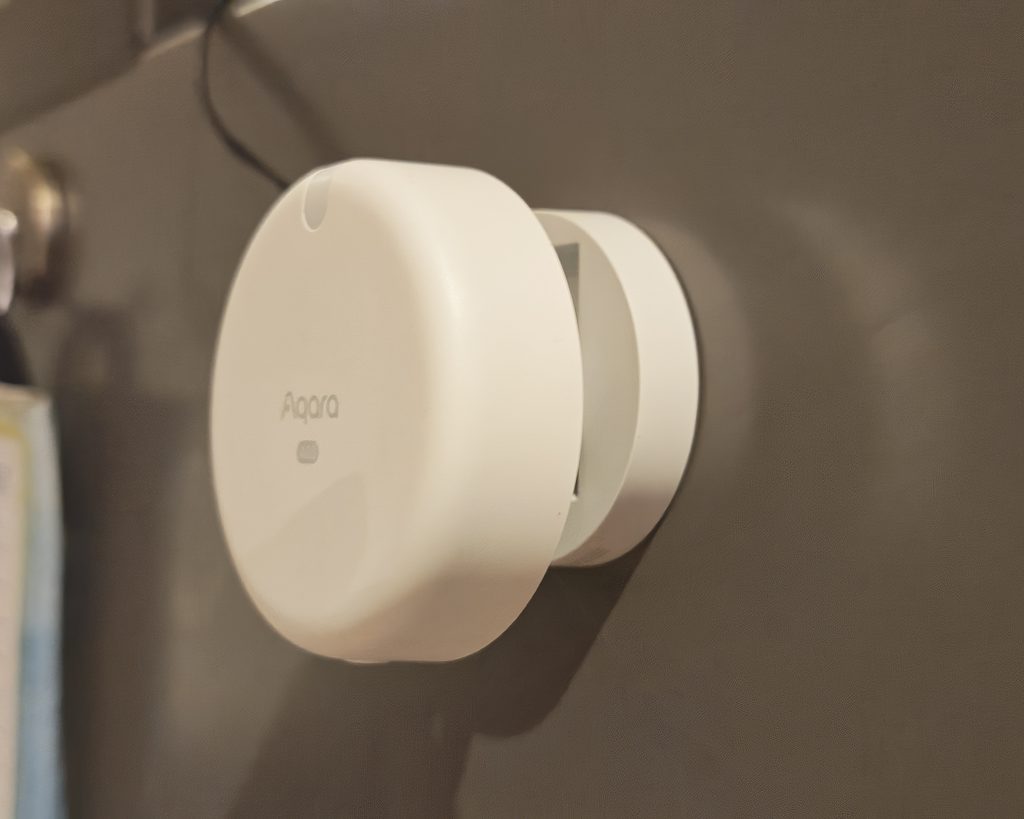
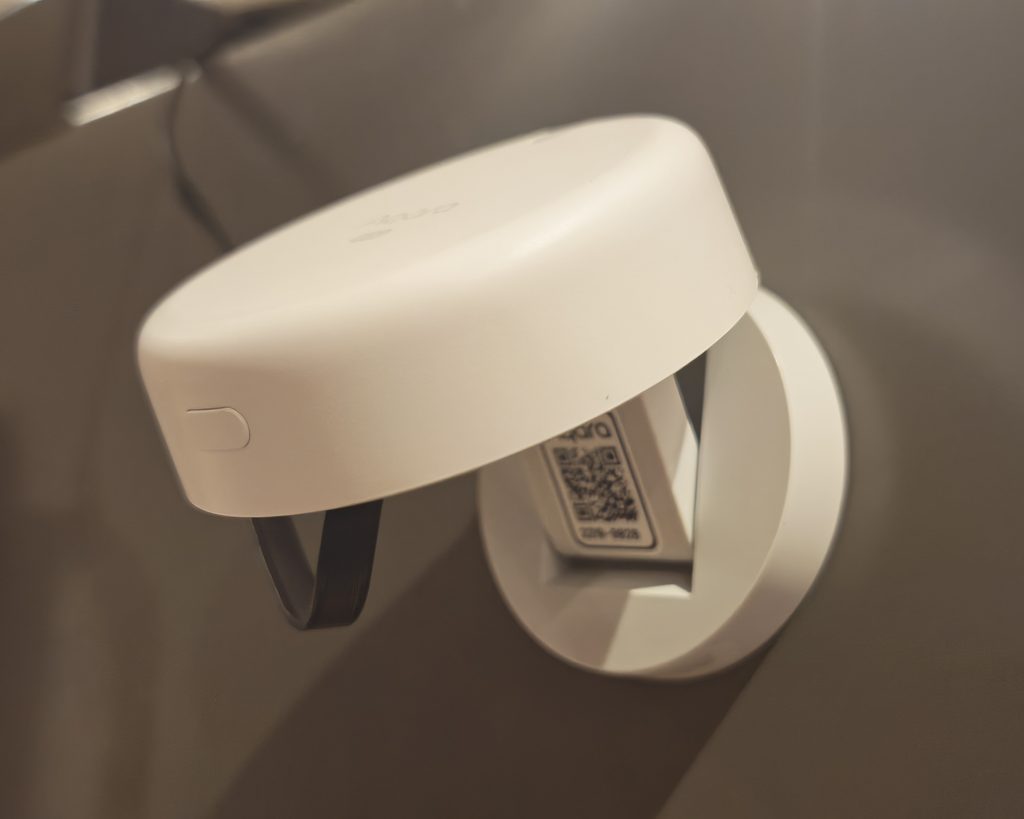
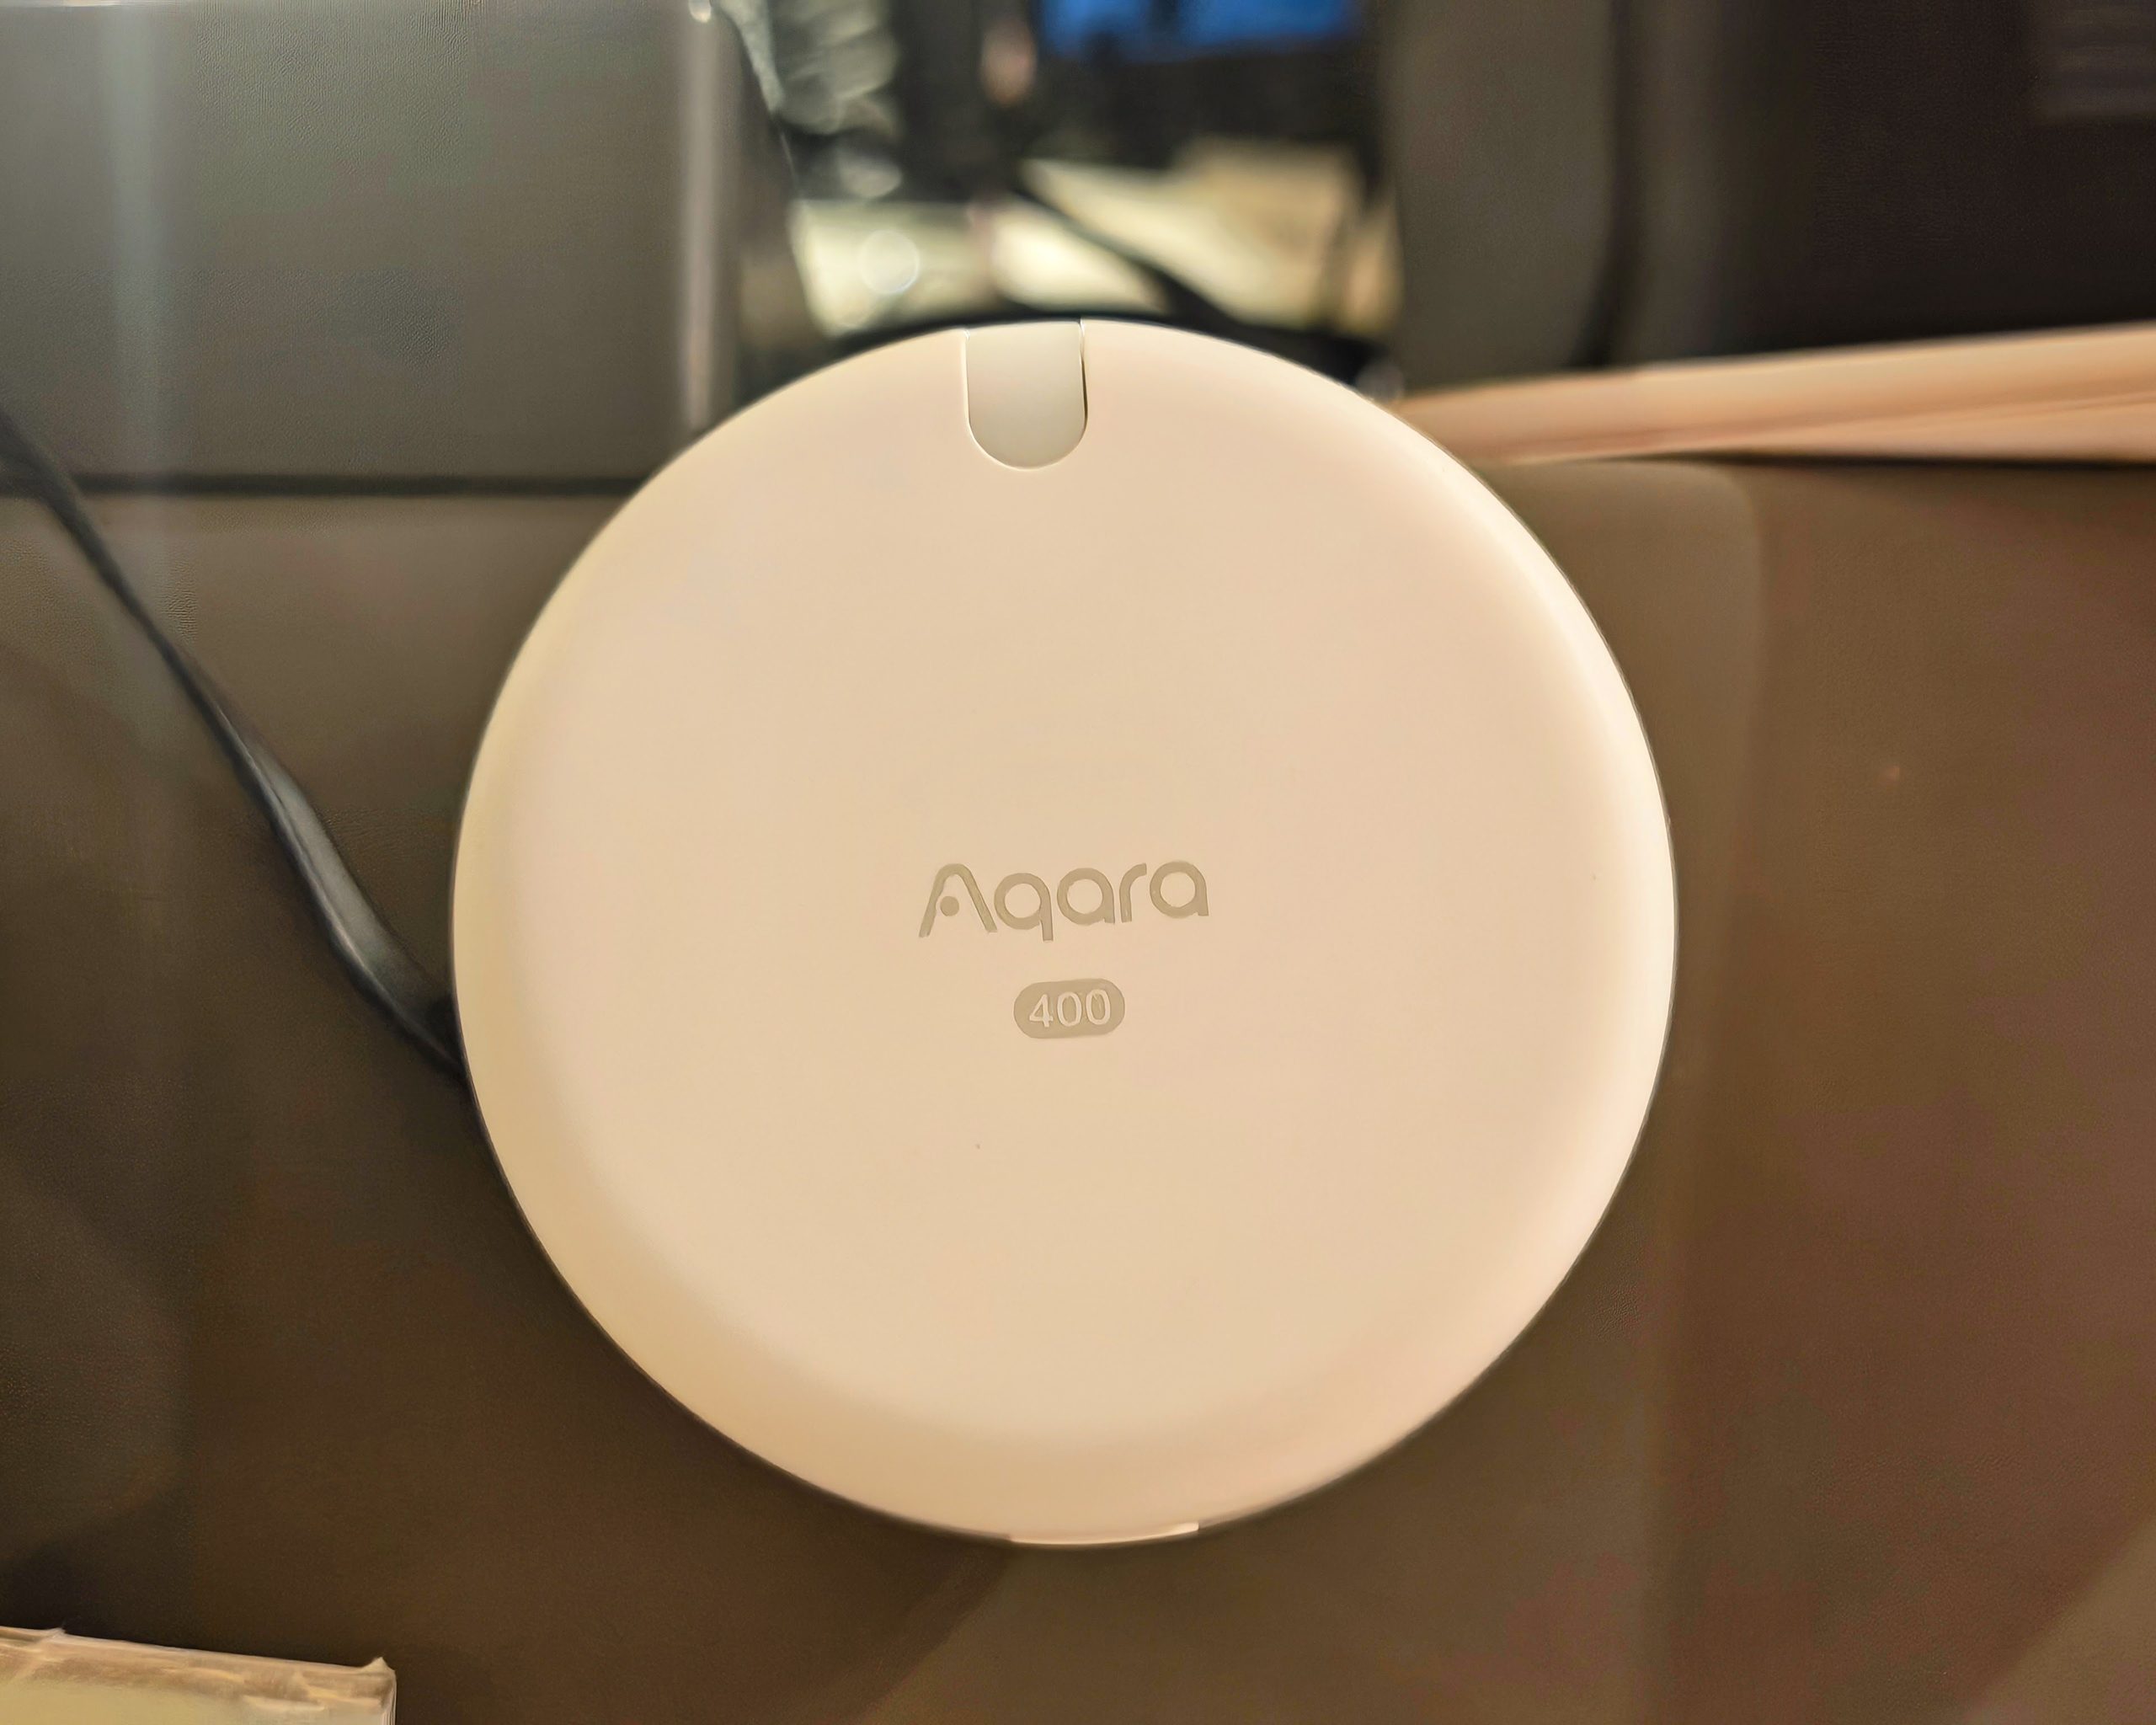
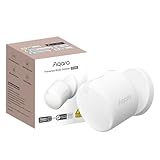
The FP400 looks almost identical to the FP2. It is a small white puck with a status LED and reset button, mounted on a flexible magnetic stand. The stand has a rubber ring on the base so it does not slide around when placed on a shelf or desk.
In the box, you get a USB-C to USB-C cable, a metal plate that the magnetic base attaches to, an adhesive pad and a screw kit. There is no power adapter, so you will need a spare USB plug. The brand retail version adds a bracket, but the Amazon version does not include one.
One detail from the manual that is easy to miss is orientation. The Aqara logo needs to be upright (or fully upside down) because the radar antennas are aligned to it. Mounting it at an angle will throw off the positioning.
The IPX5 rating means it copes with splashes and humidity, so it is suitable for kitchens and bathrooms. I tested mine in the kitchen.
Set Up
Setup is more involved than a traditional motion sensor. The sensor needs to be mounted on a wall (either in the corner or central) or ceiling, and it is USB powered, so some thought is required when deploying these within your home. Unlike the battery-powered FP300, you cannot simply stick it anywhere. You need a socket or a tidy cable run to a suitable height, and that is likely to be the biggest limiting factor for most people.
For my test, to keep the installation as simple as possible, I placed this on the fridge in my kitchen, as the sensor has a magnetic bottom, then powered it with a Ugreen power bank. This worked well for testing, but it is not a long-term solution, and you can see gaps in the history graphs when the power bank ran flat.
When you first power it on, the Aqara Home app picks it up automatically. The FP400 ships in Thread mode, and if you want to use Zigbee you have to switch it over at this point. The app connects over Bluetooth, downloads the Zigbee firmware and transfers it to the sensor, which takes several minutes. I switched mine to Zigbee and paired it with my Aqara Hub M3, as this unlocks the most features. You can change protocol later, but it means pairing the sensor again from scratch.
The sensor also has to be angled correctly for it to work. You then need to choose the installation method (wall, corner or ceiling) and set its height, which must be between 150 cm and 400 cm. Aqara recommends 1.5 to 2 m for wall and corner mounting, which balances standing and seated detection, and 3 to 4 m for ceilings. Mount it too low and it will pick up pets more often. Mount it too high on a wall and you end up with a larger blind spot directly in front of the sensor.
Corner mounting is generally the best option for smaller rooms, as it makes full use of the 120° field of view and avoids the blind spots either side of a sensor mounted in the middle of a wall. For larger spaces, the centre of a wall gives you the most distance.
Once physically installed, you need to calibrate it by setting the detection zone, which requires you to walk along the edge of the space in a circuit. The map fills in as you walk, and once the boundary is closed you can confirm it. This step is optional. If you skip it, the AI mapping will attempt to work out the room layout, including entrances, over the next few days. I prefer the walk-through, as it is quick and you know the boundary is correct from the start.
Then, you need to leave the room and allow it to calibrate itself without anything in the room moving. This takes a minute or so, and after that the sensor is ready to use.
Overall, the process is well guided, and the app explains each step clearly. It is still more work than an ordinary PIR sensor, and I would expect most people to spend some time adjusting the position and settings before they are completely happy with it.
Aqara App – UI and Settings
The FP400 is managed through the Aqara Home app. I paired it with my Aqara Hub M3 over Zigbee. The layout will be familiar if you have used the FP2, although the FP400 has fewer zones to configure and a few new AI features.
Main screen and zone map
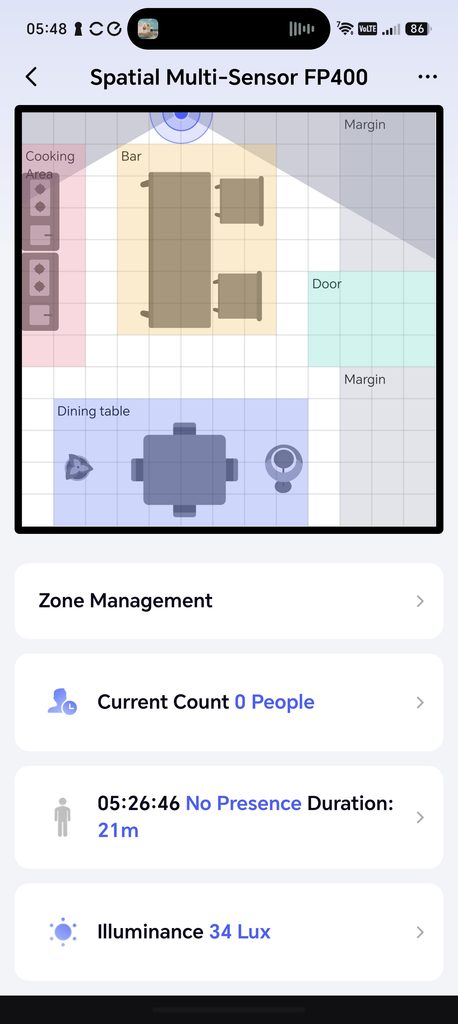
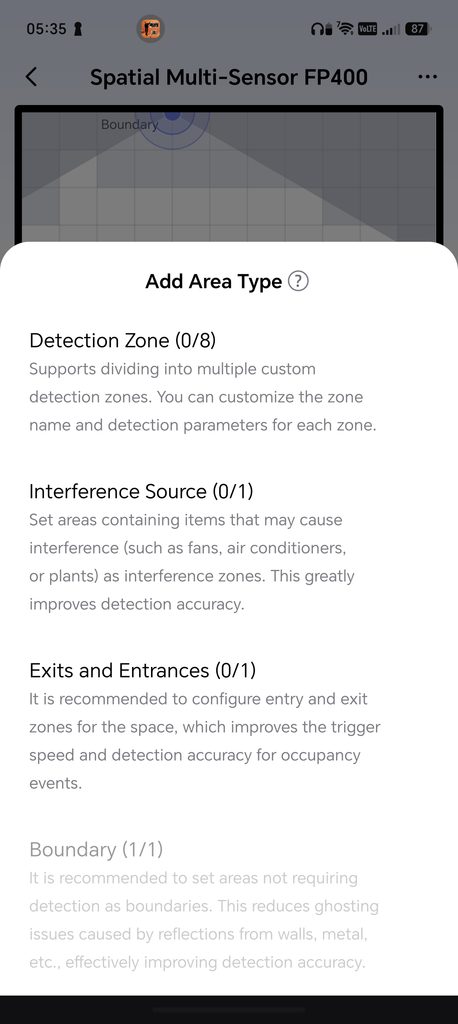
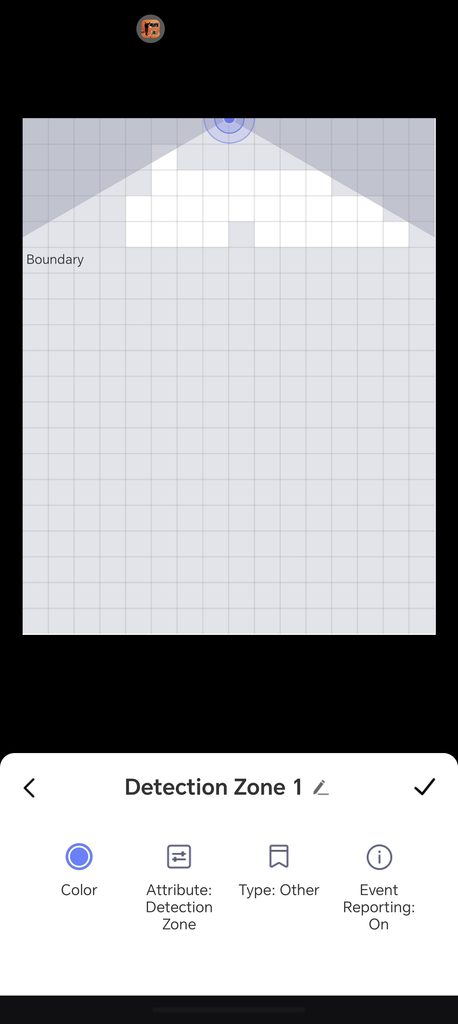
When you open the sensor, the first thing you see is a live map of the room on a grid. Each square represents 0.5 x 0.5 m. The sensor’s position is marked on the wall, and the areas outside its field of view are greyed out. The detected room boundary from the calibration walk is overlaid on top. With my sensor on the fridge, the map shows the 120° spread well. It also makes it obvious that the corners closest to the sensor are not covered, which is a useful sanity check that you have mounted it in a sensible place.
Zones are created from the Zone Management menu or by long pressing on the map. You tap the grid squares to build each zone, then give it a type, such as a desk, sofa or dining table, along with a colour. You can also add furniture, entrances and exits, and interference sources such as fans or plants, which the sensor will then filter out.
Below the map there is a presence card showing the current status and how long it has lasted, plus an illuminance card with the current light level. When I took the screenshots, it was reading 13 lux in the kitchen before sunrise.
Tap either card to see the history for that sensor. The presence log shows each event with a timestamp and duration, such as “Presence detected for 2 min 32 sec”. The light sensor has a day and week view, and my week peaked at 502 lux. The graphs work, but they have a couple of rough edges. The history screens are fixed to GMT+00:00, so during British Summer Time the log timestamps are an hour behind the main device card. The device card showed 05:10:21 for the same event that the log recorded at 04:10:21. The lux graph also joins the dots across periods when the sensor was offline, which in my case was when the power bank ran flat. That produces long straight lines across the graph rather than an obvious gap, and it can be misleading if you are not aware of it.
Function settings
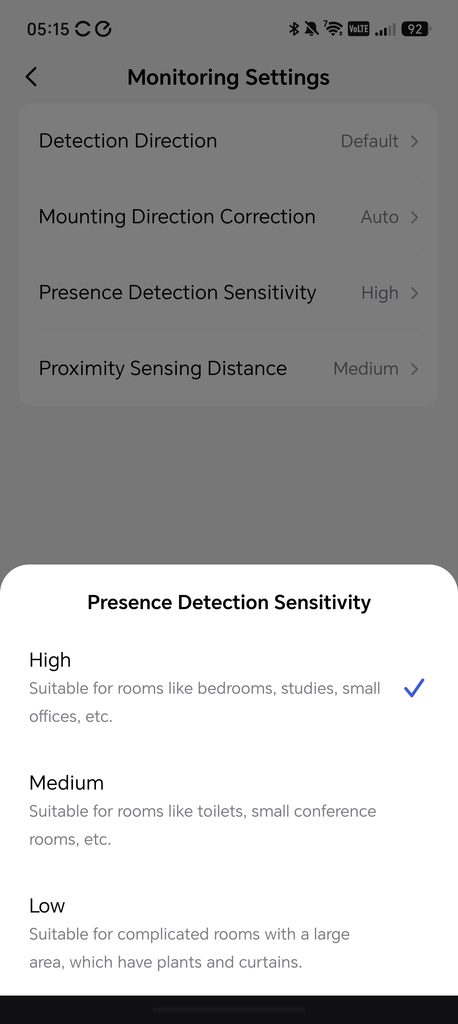
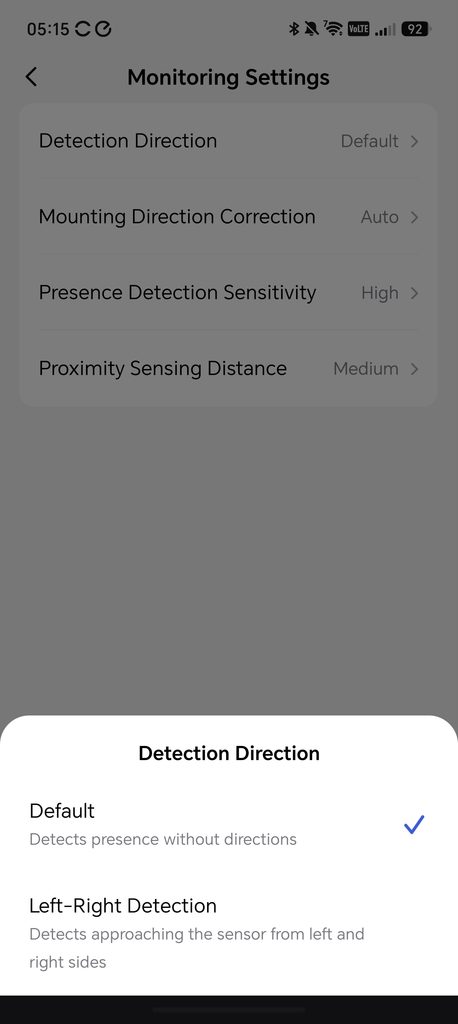
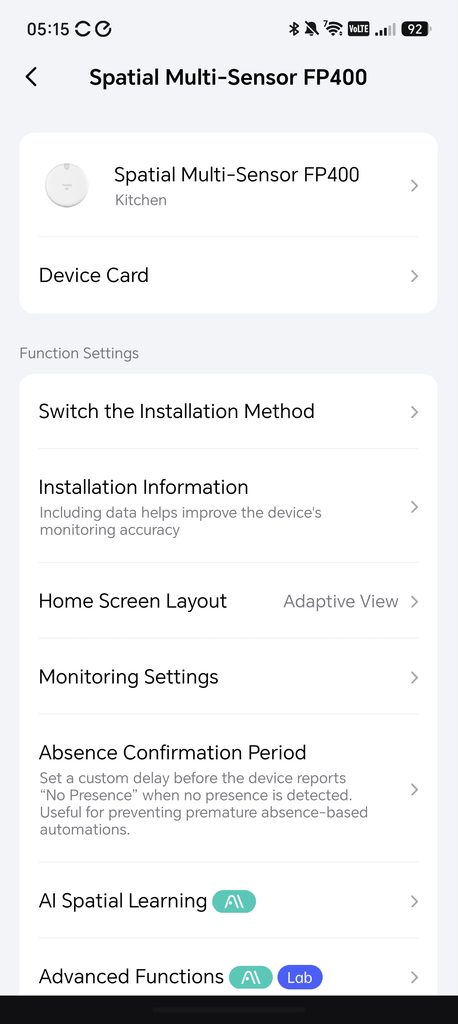
The settings menu is fairly extensive:
- Switch the Installation Method: Change between wall, corner and ceiling mounting without removing and re-adding the sensor.
- Installation Information: Enter the mounting height and other details, which Aqara says improves accuracy.
- Home Screen Layout: Defaults to Adaptive View, which zooms in on your mapped area, or you can switch to Full View.
- Monitoring Settings: Detection behaviour, covered below.
- Absence Confirmation Period: A custom delay before the sensor reports “No Presence”. This is useful for stopping lights from switching off while you are sitting still.
- AI Spatial Learning: An optional calibration that learns the room’s surroundings.
- Advanced Functions: A Lab section with experimental AI features.
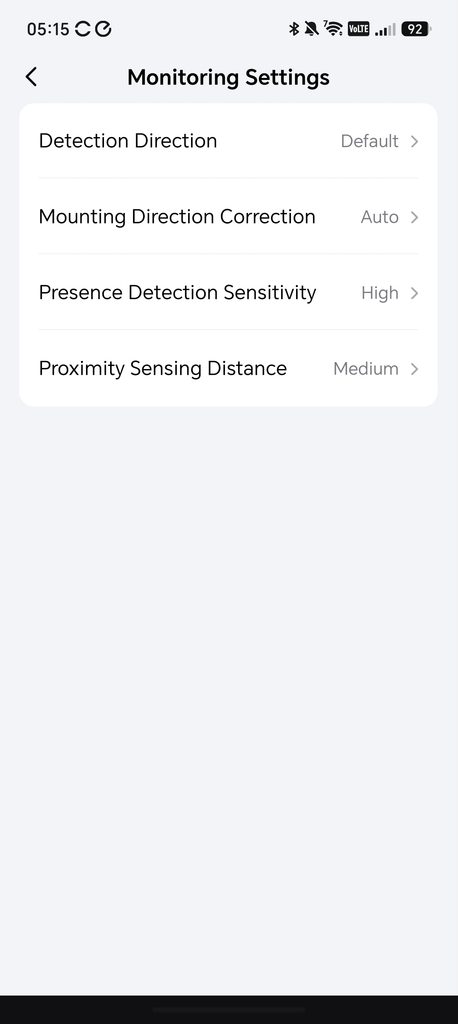
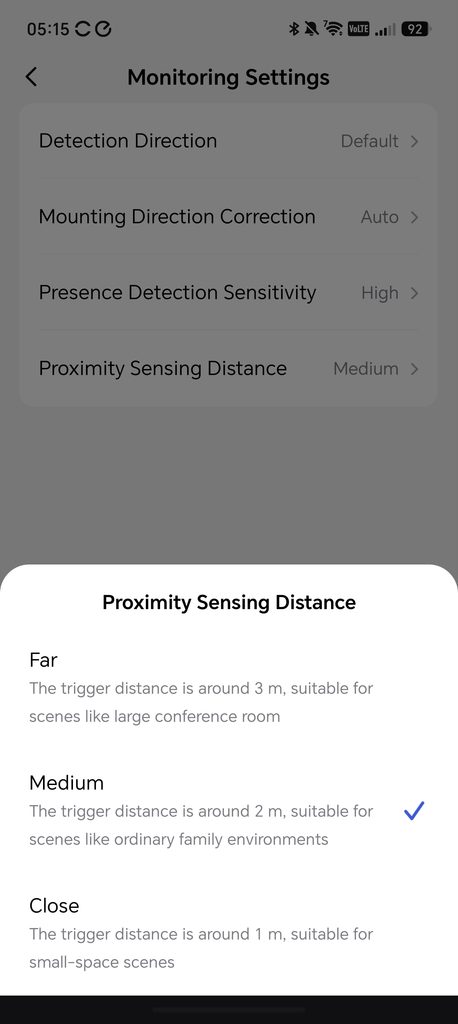
Monitoring Settings is where most of the tuning happens. Presence Detection Sensitivity has three levels. High is recommended for bedrooms, studies and small offices, Medium for toilets and small meeting rooms, and Low for large or cluttered rooms with plants and curtains that might cause false triggers. Proximity Sensing Distance sets how close someone needs to be to trigger the proximity function: Far is around 3 m, Medium around 2 m and Close around 1 m. Detection Direction can be left on Default, which reports presence without direction, or switched to Left-Right Detection, which tells you which side someone approached from. That could be handy for a hallway or doorway. Mounting Direction Correction is set to Auto by default, and I did not need to change it.
Several of these settings, including sensitivity and the absence confirmation period, can be set per zone. That is useful, as a sofa zone might need a long timeout, while a zone by the kettle can clear quickly.
AI Spatial Learning is recommended once the sensor is in its final position. You start it and then leave the room empty of people and pets for a few minutes while it builds a picture of the static space. It is similar to the calibration step during setup and is worth rerunning if you move furniture or the sensor.
Advanced Functions (Lab)
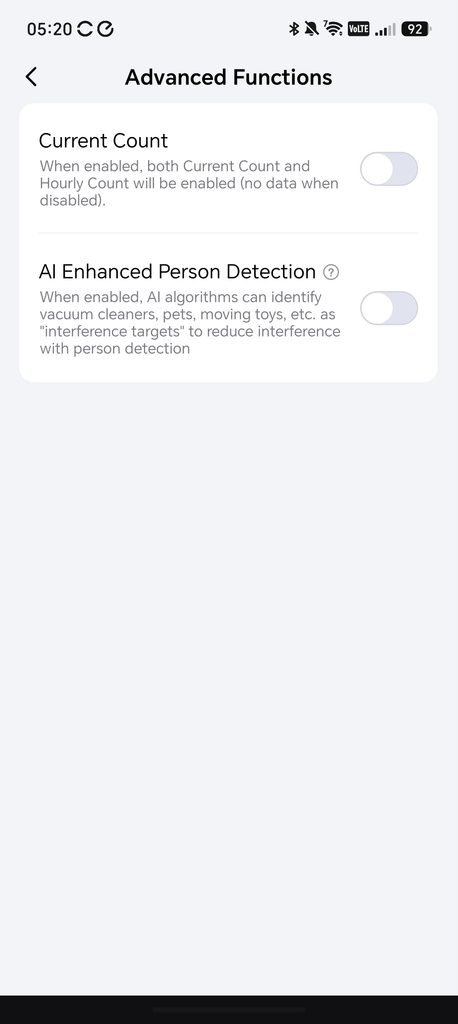
Two features sit in the Lab section, and both were off by default on my unit:
- Current Count: Enables the live headcount and hourly count. Without it there is no count data at all.
- AI Enhanced Person Detection: Uses AI to classify robot vacuums, pets and moving toys as “interference targets” so they do not register as people.
It is a little odd that headcount, one of the FP400’s main selling points over simpler presence sensors, is hidden behind a Lab toggle. The firmware release notes suggest this is changing, though. My sensor shipped on firmware 0051, and version 0060 was waiting in the app. It lists an optimised radar algorithm and fixes for false detection in corners, with wall mounting, when sitting or lying on a bed, and near hanging lamps. It also fixes coordinate jitter and packet loss, and it turns current count reporting on by default. Those fixes cover a lot of common mounting scenarios, so I recommend installing the update as soon as you have paired the sensor.
Aqara is also upfront about the accuracy of the headcount. Its documentation states that with several people in a room, the count can be out by one to three people because of overlapping radar points and people blocking each other. It suggests using the count as a trend rather than an exact figure. That is a reasonable explanation of how mmWave radar works, but it does limit how much you can rely on the count for automations. The AI Enhanced Person Detection is still labelled as a Lab feature, and early reports suggest it can take a second or two to decide whether a medium-sized pet is a person. I would treat both as useful extras rather than something to base important automations on for now.
General settings
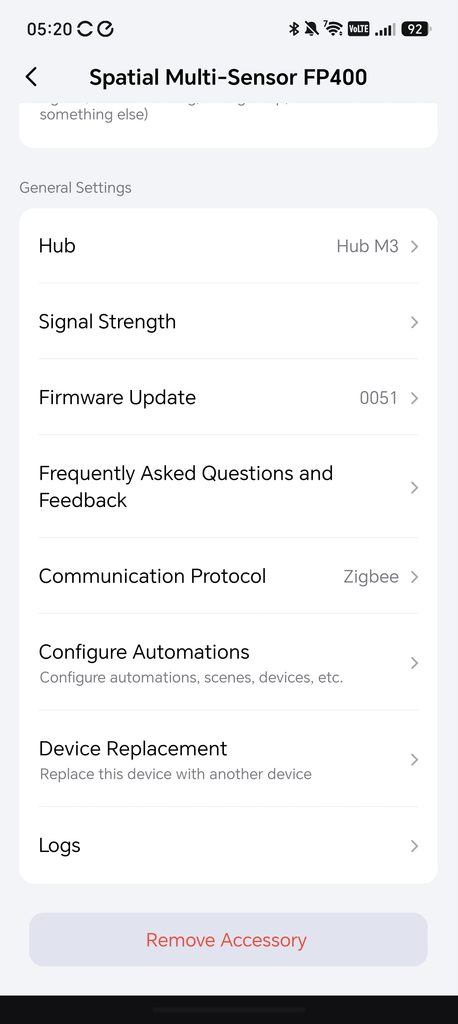
The lower half of the menu covers the usual Aqara options. You can see the hub the sensor is connected to (Hub M3 in my case), check signal strength, update firmware, change the communication protocol (Zigbee or Thread), view logs and configure automations. There is also a Device Replacement option, which lets you swap in a new sensor without rebuilding your automations. That is a small but useful addition if you ever need to replace a faulty unit.
Overall, the app is well organised and gives you far more control than a typical motion sensor. The descriptions next to each option make the settings easy to understand without a manual. My main criticisms are the GMT-only history graphs, headcount being off by default on launch firmware, and the fact that some features, such as the headcount and AI detection, only work fully in the Aqara app.
Automations
The Aqara app has a wide range of automation triggers for the FP400, and this is where it has a clear advantage over a basic motion sensor. Available triggers include:
- Occupied or unoccupied, either for the whole room or an individual zone
- Occupied or unoccupied for a set duration
- Someone approaching or leaving the sensor
- Entering from the left or right when Left-Right Detection is enabled
- The number of people being greater than or equal to a set figure
- Everyone in the room being stationary, or people moving
- Illuminance rising or dropping past a set level
The obvious use is lighting. With zones, you can have one set of lights respond to the dining table and another to the kitchen counter, all from a single sensor. Combining presence with the built-in light sensor means lights only turn on when a zone is occupied and the room is dark enough, which avoids them coming on during the day. Before presence sensors, this would have needed several PIR sensors, and even then, lights would switch off if you sat still for too long.
In a kitchen, a simple occupied and dark trigger for under-cabinet lighting works well, paired with a longer absence confirmation period so the lights stay on while you are standing still at the worktop. The Proximity Sensing Distance setting also opens up some useful options, such as turning on a display or a specific light only when someone walks close to the sensor.
The headcount triggers are the most novel addition, although I found it harder to think of practical uses in a home. Adjusting heating or ventilation when several people are in a room is the most sensible example. Given Aqara’s own warning that the count can be out by one to three people, I would not use it for anything where precision matters.
Automations created in the Aqara app run locally on the hub, so they keep working if your internet connection drops. If you prefer to keep all your automations in one place, the zones can be exposed to other platforms instead, which I cover next.
Integration with Home Assistant and other third-party smart home ecosystems
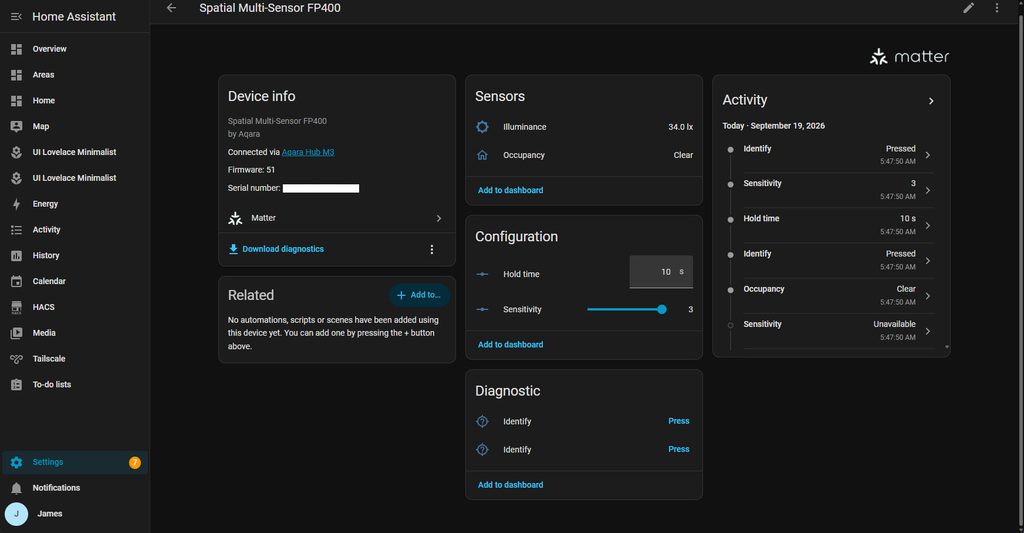
How much of the FP400 you can use outside the Aqara app depends on how you connect it, and this is the most confusing part of the product.
There are three main options:
- Thread, added directly to a Matter platform: You do not need an Aqara hub or the Aqara app. You just need a Thread Border Router, such as an Apple TV, HomePod, Google Nest Hub or a Home Assistant setup with a Thread radio. The FP400 then appears as one overall presence sensor and one light sensor. Zones are not available.
- Thread, configured in the Aqara app first: You can still skip the hub, but you use the Aqara app on the same network to set up zones, sensitivity and the absence period. The sensor can then expose the whole-area presence sensor, up to eight zone sensors and the light sensor over Matter.
- Zigbee via an Aqara hub: This requires a hub such as the M3 or M100 and unlocks all the features, including the Lab functions. The hub then shares the presence, zone and light sensors with other platforms through its Matter bridge.
For Home Assistant users, option two or three is the one to choose. With Zigbee through an Aqara hub, the FP400 appears in Home Assistant’s Matter integration with an illuminance sensor and an occupancy sensor for the whole area, plus an additional occupancy sensor for each zone. To add it, you generate a Matter pairing code in the Aqara app under the hub’s third-party Matter ecosystems settings. The code is valid for 10 minutes. This process is a little clumsy, as you need to switch between the Aqara app and the Home Assistant companion app, but it only needs doing once.
There are a few quirks. New zones appear in third-party platforms with the same generic name as the main sensor, so you need to rename each one to keep track of which is which. Aqara also warns that some platforms do not support zones being added or deleted after pairing, so it is best to finish your zone setup in the Aqara app before sharing the sensor. The headcount, direction and AI detection features are not exposed over Matter, so automations using those need to stay in the Aqara app.
Zigbee2MQTT users may be tempted to skip the Aqara hub altogether and pair it directly. At the time of writing, support is limited, and early reports suggest most entities are unavailable or do not report data. The FP300 is supported, so it seems likely support for the FP400 will follow, but I would not buy one for Zigbee2MQTT until it has been added.
Compared with the Wi-Fi based FP2, this is a clear improvement for anyone using Home Assistant, Homey, SmartThings or several ecosystems at once. Zigbee and Thread both form a mesh network that is better suited to sensors than Wi-Fi, and everything runs locally. It is frustrating, though, that getting the full feature set still pushes you towards buying an Aqara hub.
Price and Alternative Options
The Aqara Spatial Multi Sensor FP400 is available to buy now from Aqara for £80.
The Presence Sensor FP300 is available on Amazon for £50.
The Aqara Presence Sensor FP2 is £67 and the FP1E is £40.
The FP400 costs £13 more than the FP2. For that money, you get double the tracking capacity, a larger detection area and a much better choice of connectivity. However, you lose fall detection, sleep monitoring and 22 zones. If you are happy with Wi-Fi and want those features, the FP2 is still worth considering while it remains on sale.
The FP300 is the better option for most people who only need to know whether a room is occupied. It is battery powered with a claimed three-year battery life, so installation is far easier, and it adds temperature and humidity sensing. It does not support zones or multi-person tracking, though.
The FP1E is the cheapest way into Aqara’s mmWave sensors at £40. It is Zigbee only, so you need a hub, and it does not offer zones, but for simple room occupancy it does the job.
Outside Aqara, there are plenty of cheaper Tuya-based mmWave sensors, as well as the Everything Presence range, which is popular with Home Assistant users. The Everything Presence Lite and One offer zones and target tracking through ESPHome, but they rely on Wi-Fi and require more tinkering. The FP400’s advantage is its polished app, Matter support and wide ecosystem compatibility.
Overall
The Aqara Spatial Multi Sensor FP400 is a worthwhile update to the FP2. The move from Wi-Fi to Zigbee and Thread is the most important change, and it makes the FP400 far easier to use across Apple Home, Google Home, Alexa, SmartThings, Homey and Home Assistant. Tracking up to 10 people, the larger 10 x 8 m coverage area and the eight configurable zones make it one of the most capable presence sensors you can buy at this price.
The Aqara app is also a strength. The walk-through calibration is quick, the zone map is easy to understand, and the settings are well explained. Per-zone sensitivity and absence timers make it possible to fine-tune each area of a room, and the firmware update available at launch addresses many common false detection scenarios.
It is not without its downsides. It needs a permanent USB power supply, which makes placement more difficult than a battery sensor. The headcount and AI person detection are still Lab features, and Aqara admits the count can be out by one to three people. The GMT-only history graphs are a minor irritation, and the connection options are more confusing than they should be. It also loses the FP2’s fall detection, sleep monitoring and higher zone limit, which will matter to some buyers.
If you are buying a zone-capable presence sensor for the first time, the FP400 is the one I would recommend in Aqara’s range, particularly if you already have an Aqara hub or a Thread network. If you already own an FP2 and it does everything you need, there is less reason to upgrade unless you want to move it off Wi-Fi or need the larger coverage area.
Aqara Spatial Multi Sensor FP400 Review
-
Overall - 80%80%
Summary
I think the Aqara FP400 is a capable option for households invested in Aqara, with flexible connectivity, useful zone controls and extensive detection settings. At £80, however, its appeal depends on using those advanced features. Installation requires careful positioning and calibration, while limited third-party access to zones and headcount makes it less compelling for Home Assistant users. It is worth considering for Aqara automations, but it is not a straightforward upgrade from the FP2.
Pros
- Supports both Thread and Zigbee.
- Tracks up to ten people.
- Offers eight configurable detection zones.
- Provides extensive detection settings.
Cons
- Advanced features depend on Aqara.
- Requires careful positioning and calibration.
- Needs continuous USB-C power.
- Supports fewer zones than FP2.

I am James, a UK-based tech enthusiast and the Editor and Owner of Mighty Gadget, which I’ve proudly run since 2007. Passionate about all things technology, my expertise spans from computers and networking to mobile, wearables, and smart home devices.
As a fitness fanatic who loves running and cycling, I also have a keen interest in fitness-related technology, and I take every opportunity to cover this niche on my blog. My diverse interests allow me to bring a unique perspective to tech blogging, merging lifestyle, fitness, and the latest tech trends.
In my academic pursuits, I earned a BSc in Information Systems Design from UCLAN, before advancing my learning with a Master’s Degree in Computing.
I’m proud to share that Vuelio has consistently ranked Mighty Gadget as one of the top technology blogs in the UK. With my dedication to technology and drive to share my insights, I aim to continue providing my readers with engaging and informative content.
I work directly with the companies he reviews products for or their chosen PR agency.
For Social Media, you can find me on: