ZimaBoard 2 Review – Single Board NAS Server with Intel N150 CPU – ZimaOS Review
The ZimaBoard 2 is an interesting single-board server powered by an Intel N150 and running ZimaOS, a simplified NAS OS with a wide range of features comparable to Unraid.
The ZimaBoard 2 itself only has limited storage, so it’s not much use as a NAS on its own, but it has plenty of ports for expandability, and you can buy accessories, including a hard disk tray to turn it into a 2-bay NAS.
Due to the self-build nature of this, it is not as accessible as other NAS hardware such as Synology, QNAP, Ugreen, and TerraMaster, but it is reasonably well priced compared to the big brand names, and I have been particularly impressed with ZimaOS.
I was sent the Mini NAS Kit with 8GB of RAM and 32GB of eMMC storage, and I have run it with a 4TB Seagate IronWolf and a 256GB Kioxia NVMe drive fitted via the PCIe slot. That gave me a reasonable idea of how the board behaves both as a small file server and as a general Docker host, which is realistically how most people will use it. I already run a mix of mini PCs on Proxmox alongside UniFi networking at home, so I was mainly interested in whether ZimaOS could replace some of that with something simpler.
ZimaBoard 2 Specification
| Specification | ZimaBoard 2 |
| Models | 832 / 1664 |
| Pre-installed OS | ZimaOS |
| Compatible operating systems | CasaOS / Linux / Windows / OpenWrt / pfSense / Android / LibreELEC |
| Processor | Intel N150, 4 cores, 6 MB cache, up to 3.60 GHz |
| Memory | 8 GB (832) / 16 GB (1664), LPDDR5 4800 MHz |
| Onboard storage | 32 GB (832) / 64 GB (1664), eMMC |
| TDP | 10 W |
| SATA | 2 x SATA 3.0 6 Gb/s ports with power |
| Ethernet | 2 x 2.5GbE ports |
| USB | 2 x USB 3.1 ports |
| PCIe expansion | 1 x PCIe 3.0 slot |
| Display output | Mini DisplayPort 1.4, up to 4K at 60 Hz |
| Graphics frequency | Up to 1 GHz |
| Power supply | 12 V, 5 A (60 W), supporting two high-capacity HDDs |
| Onboard interfaces | 1 x 4-pin CPU fan connector, 1 x LPC, 1 x front panel connector |
| Cooling | Fanless |
| Virtualisation support | Intel VT-x and VT-d |
| Encryption acceleration | Intel AES New Instructions |
| Dimensions (W x D x H) | 140 x 83 x 31 mm |
The N150 is the part that does most of the work here, and it is worth being clear about what it is. It is a four core, four thread Alder Lake-N chip built entirely from efficiency cores, with a 6 W base power rating and a 3.6 GHz boost. In Geekbench 6 it lands at roughly 1,250 single core and 3,000 multi core, which puts it somewhere near a mid-range laptop chip from a few years ago for single threaded work and well behind anything modern for multi-threaded work. The integrated UHD Graphics 730 has 24 execution units and supports hardware decoding for H.264, HEVC, VP9 and AV1, which matters for media serving.
That is not a criticism, as it is the correct class of chip for a low-power always-on server. It does set expectations, though. This is a machine for running containers, serving files and handling a couple of transcodes, not for compiling code or running large language models.
ZimaBoard 2 Mini NAS Kit / Start Kit
IceWhale sells the ZimaBoard 2 in three configurations, and the differences are worth understanding before you order, because the accessories are not cheap to add later.
The Board Only option is the bare board with its aluminium heatsink chassis, the power supply and a mini DisplayPort to HDMI cable. It has both SATA ports and the PCIe slot, so it is fully functional, but you have nowhere to physically mount drives.
The Starter Bundle adds the cabling you need to actually connect storage, including the SATA Y-cable that splits the board’s single SATA power header for two drives.
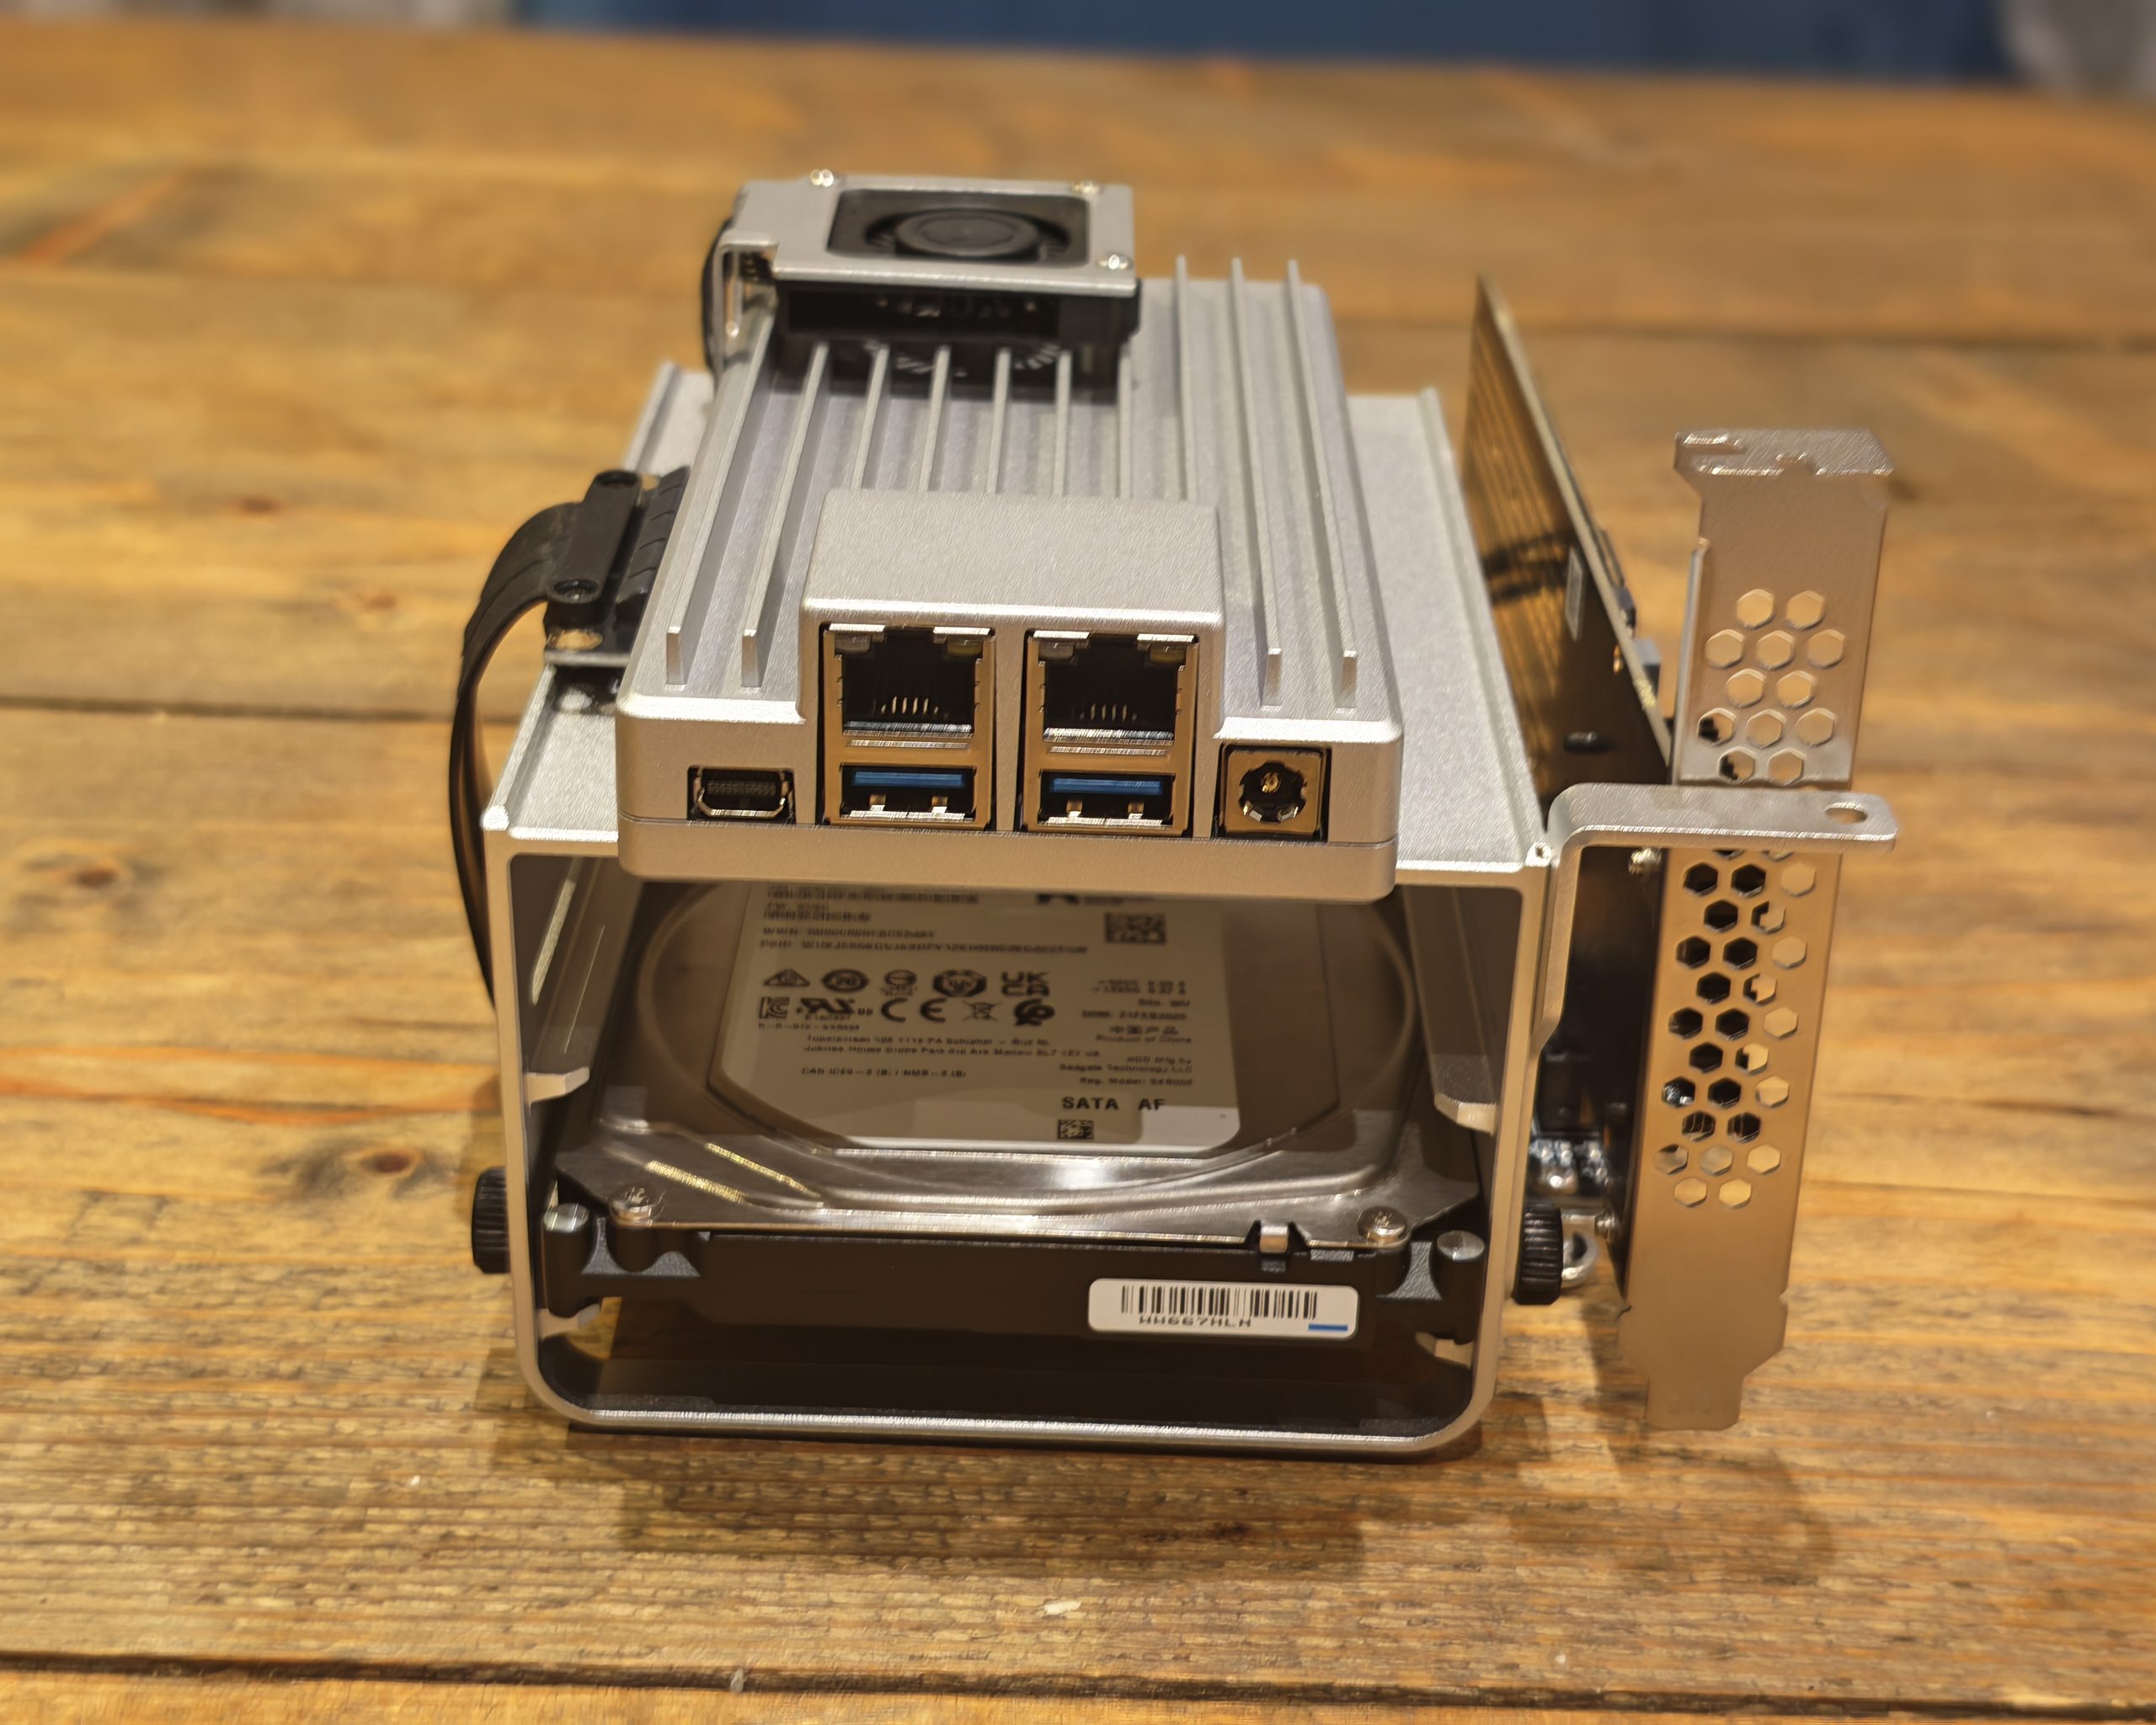
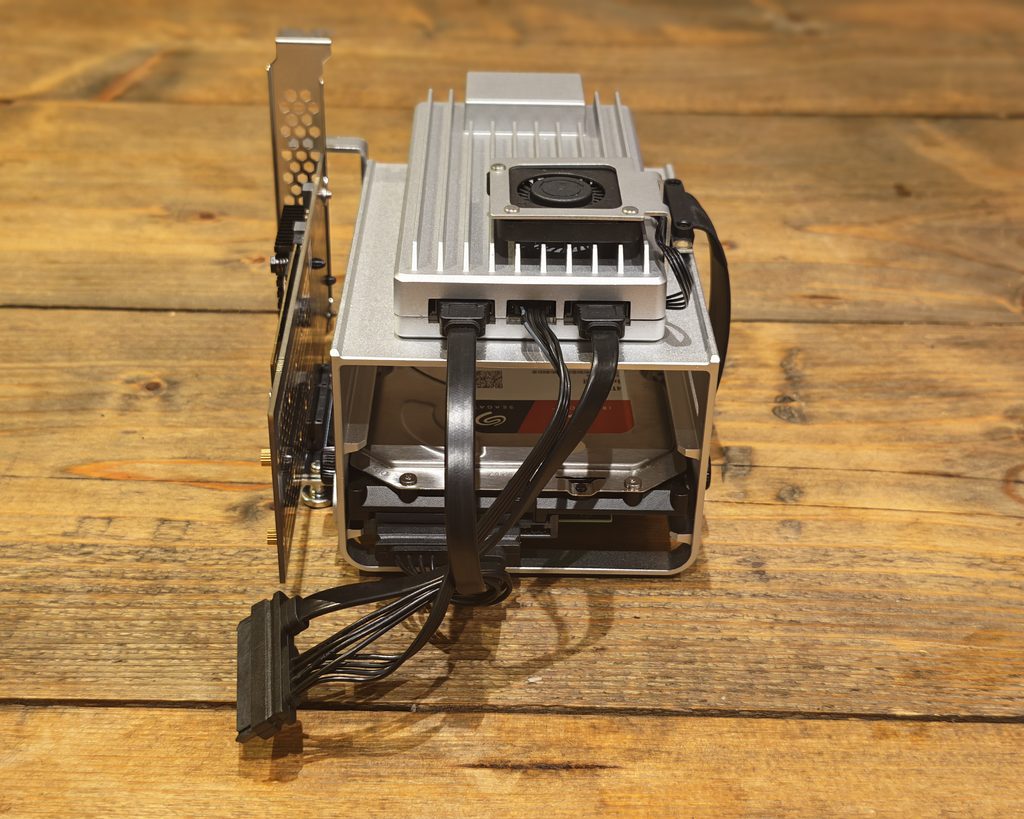
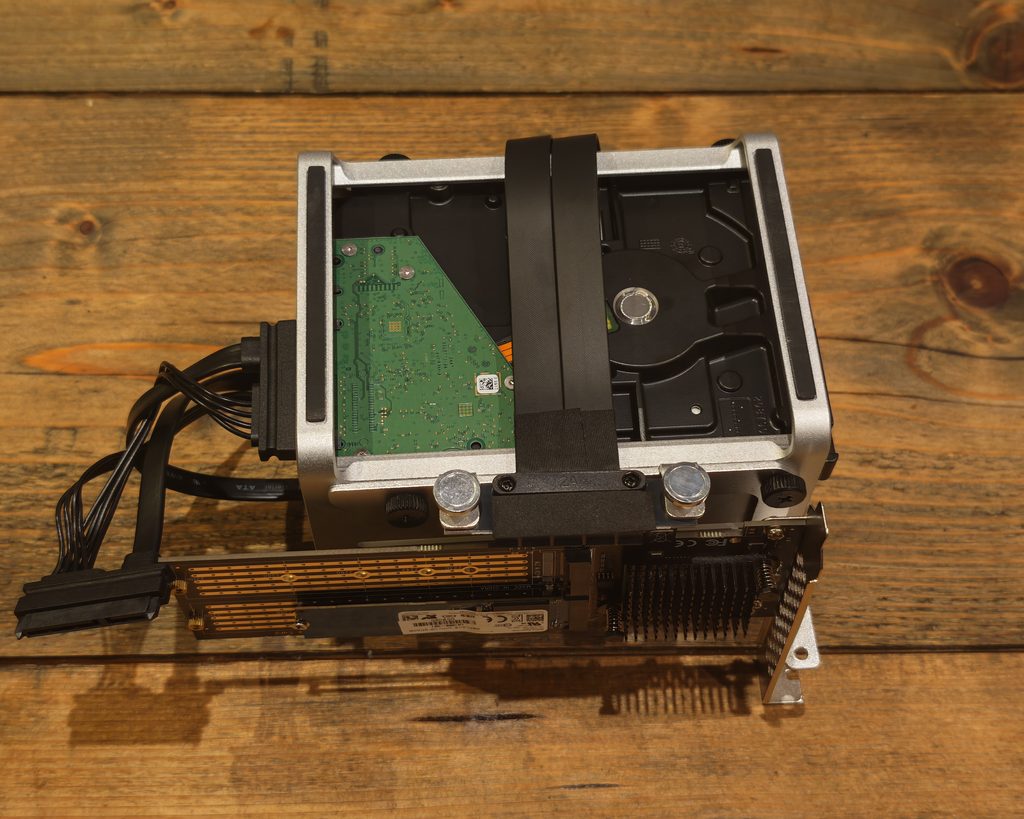
The Mini NAS Kit is the one I was sent. It adds a metal hard disk tray that holds two 3.5in drives, a cooling fan that connects to the 4-pin header, and the higher rated 60 W power supply needed to spin up two mechanical drives. The tray bolts to the side of the board and turns the whole thing into something that looks like a proper, if slightly industrial, 2-bay NAS.
Design, Ports & Assembly
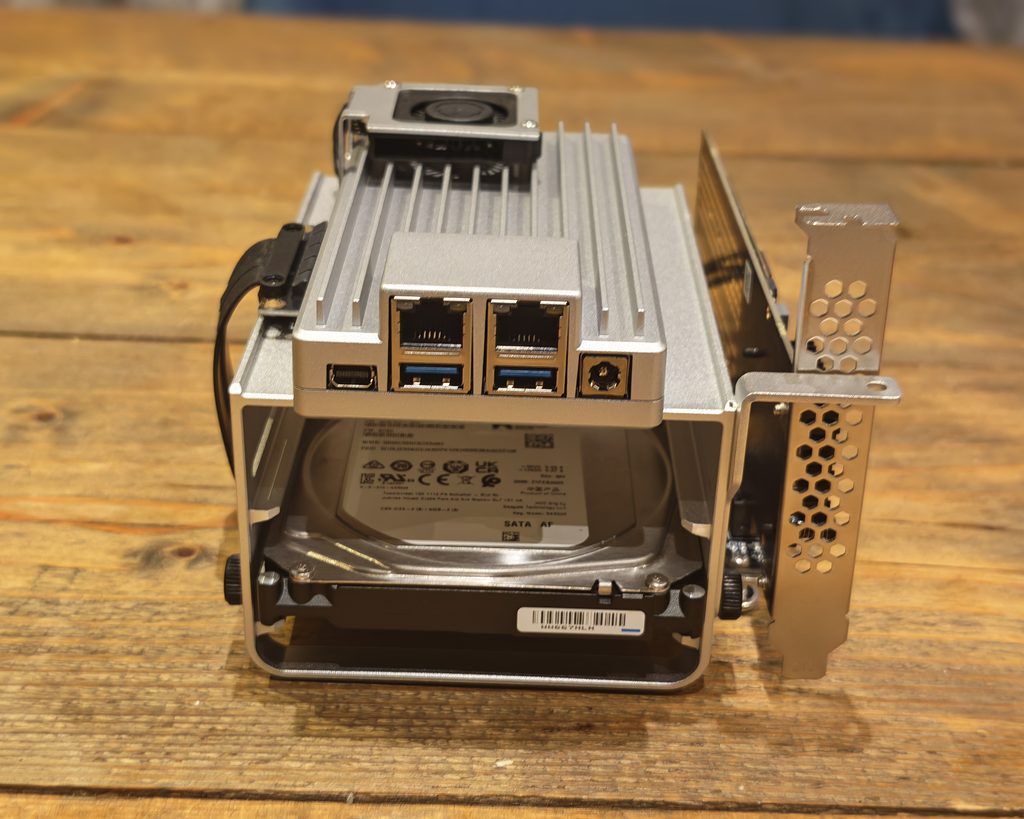
The assembly of the Mini NAS Kit was the most disappointing aspect of this review. There are no instructions included. It is not terribly difficult to figure out, but I don’t understand why any company would think this is acceptable. I ended up watching a YouTube video of another reviewer assembling it, and he also expressed frustration.
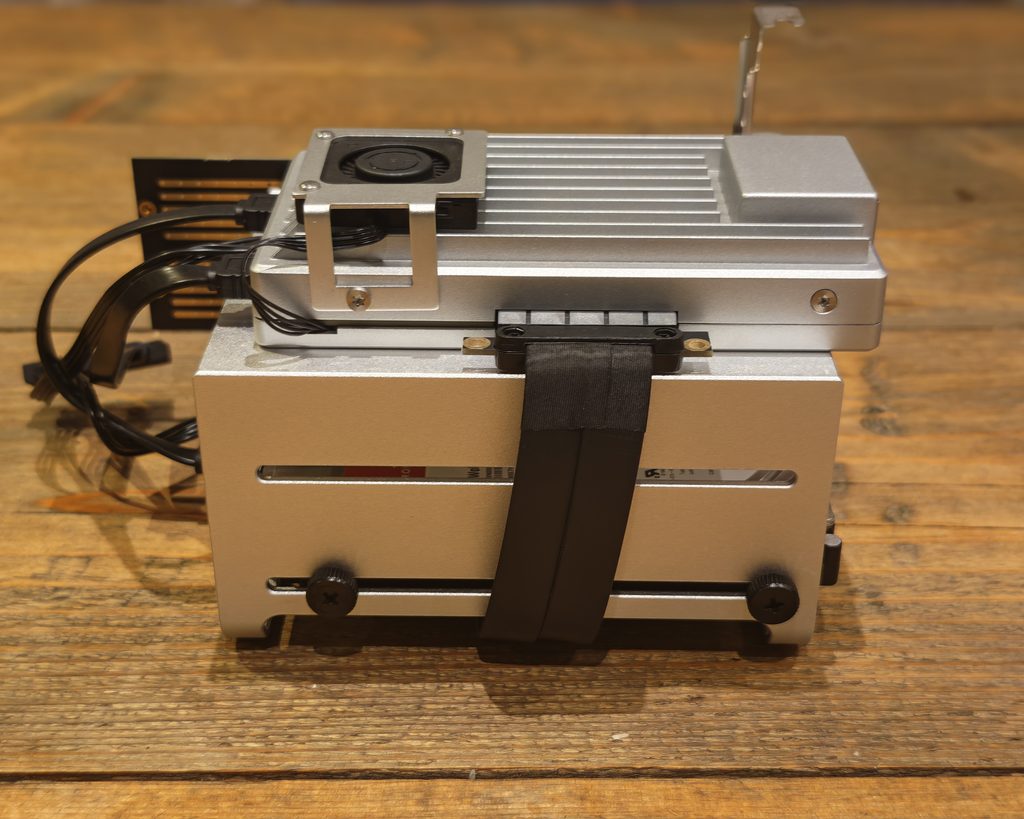
The parts themselves are fine. The chassis is a single piece of finned aluminium that acts as the heatsink for the CPU, which is why the board is fanless in its standard form. Build quality is good, the finish is even, and it feels considerably more solid than the plastic shells on most budget mini PCs. It measures 140 x 83 x 31 mm without the drive tray, so it is genuinely small.
Port selection is the strong point. On the rear you get two 2.5GbE RJ45 ports, two USB 3.1 Type-A ports, a mini DisplayPort 1.4 output good for 4K at 60 Hz, and the 12 V barrel jack. The front edge carries two SATA III connectors with 12 V power output alongside them, so drives are powered directly from the board rather than needing a separate supply. One side exposes a PCIe 3.0 x4 slot.
Two 2.5GbE ports is more useful than it first appears. It lets you run the board as a router or firewall with pfSense or OpenWrt, or keep management and storage traffic on separate networks, or simply bond the pair if your switch supports it. I have 2.5GbE throughout my UniFi setup, so I ran one port for general access and left the second free.
The mini DisplayPort output is the one port choice I would question. It works, and the adapter is supplied, but HDMI is what almost everyone has to hand. Some reviewers have also reported that the bundled adapter did not work with their displays. Mine was fine, but it is the sort of thing you only discover when you are trying to get into the BIOS.
My other complaint concerns the fan in the NAS kit. It is quiet in use, but it is another thing to mount with no guidance, and its presence rather undermines the fanless selling point. Once fitted, temperatures drop substantially, so most people fitting mechanical drives will want it.
Storage and Expansion Options
The 32GB of eMMC is the weakest hardware specification, and it is worth understanding what you actually get. After ZimaOS takes its share, my board reported a 17.7GB ZimaOS-HD volume, of which about 2.7GB was used at first boot. That is enough for the OS and a handful of container images, and not much else. If you install something like Immich or Plex with a large metadata library, you will want those app directories on a separate drive.
The 64GB model on the 1664 board gives you more breathing room, and with the 16GB of RAM it is the version I would buy if budget allows. RAM is soldered LPDDR5 and cannot be upgraded later, so this is a decision you make once.
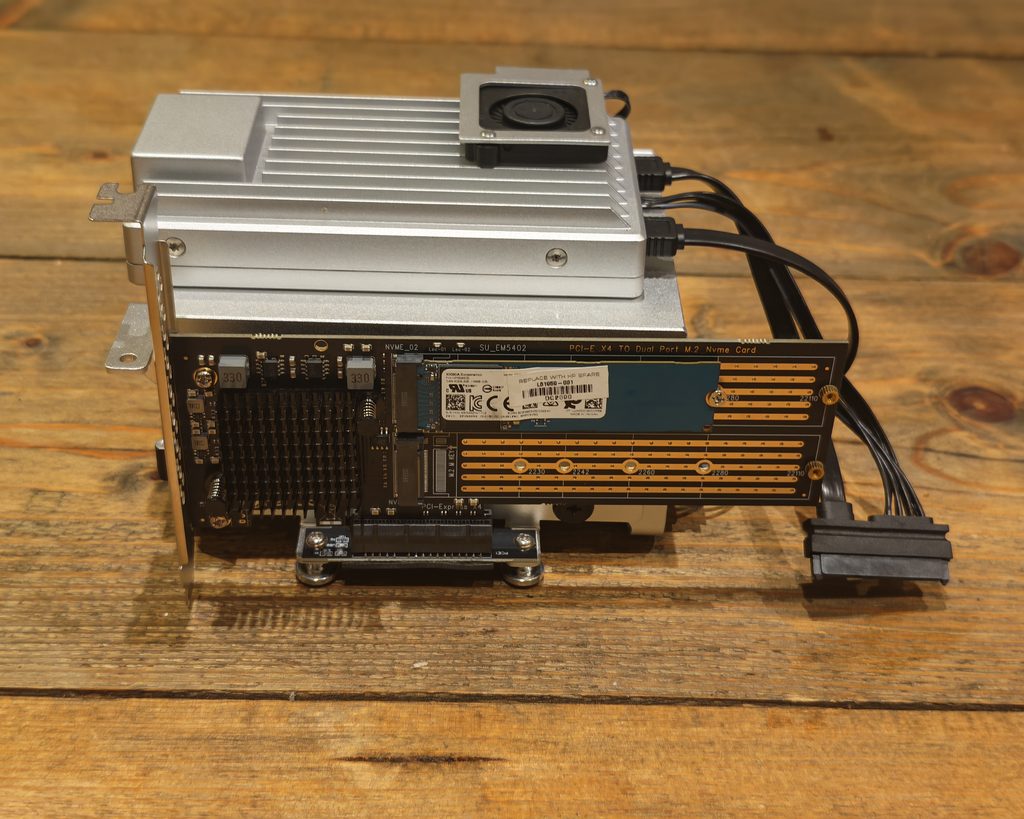
For actual storage you have three routes. The two SATA ports take 2.5in or 3.5in drives and are powered from the board. The PCIe 3.0 x4 slot takes either the ZimaBoard Dual M.2 NVMe adapter, giving you two NVMe drives, or any low-profile card you like. The USB ports will take external drives, though I would not build a NAS around them.
The PCIe slot is the part that gives the ZimaBoard 2 its character. Nothing else at this price lets you fit a 10GbE card, an HBA, or a low-profile GPU. The slot is open-ended and sits alongside the board rather than above it, so physical clearance is workable, though anything large will need mounting outside the chassis. With four PCIe 3.0 lanes you have roughly 3.9GB/s of bandwidth, which is plenty for a pair of NVMe drives or a 10GbE adapter, but it is shared, so do not expect to saturate both at once.
ZimaOS Price
ZimaOS does have some licensing costs, though they’re negligible compared to Unraid. And with any official hardware like the ZimaBoard 2, it comes with the ZimaOS+ licence included.
At the time of writing, the free licence gives you the core features, with up to 4 disks and 3 members.
The ZimaOS+ licence provides all features with unlimited disks and users for $29.
In the feature comparison, both subscriptions seem to offer the same features, but I assume the paid option will have more over time.
Considering how Unraid changed their subscription model, I think it is worth forking out the $29, just to lock in all the features in the long term.
For context, Unraid’s entry level Starter licence is $49 and now only includes one year of updates, after which you pay again to keep receiving them. A one-off $29 for unlimited disks and users looks reasonable next to that, and if you buy Zima hardware you pay nothing at all.
ZimaOS vs CasaOS
The two are made by the same company, IceWhale, and they get confused constantly, so it is worth separating them.
CasaOS is a software layer that installs on top of an existing Linux distribution, usually Debian or Ubuntu. You bring your own OS, run an install script, and CasaOS gives you a web dashboard and an app store that sits over Docker. It runs on x86-64 and ARM, so it works happily on a Raspberry Pi or an old laptop, and it is free and open source with no licence tiers at all.
ZimaOS is a complete operating system. It is built with Buildroot, ships as an image you write to disk, and the root filesystem is read-only and updated over the air as a whole image rather than through a package manager. It is x86-64 only.
The practical differences follow from that. ZimaOS handles storage properly, with a graphical RAID manager covering RAID 0, 1, 5, 6 and JBOD, disk health reporting, and SMB share management with per-user permissions. CasaOS has none of that natively, and you end up configuring mdadm and Samba by hand. ZimaOS also adds the virtual machine manager, the backup tools and the remote access service that CasaOS lacks.
The trade-off is flexibility. Because the ZimaOS root filesystem is immutable, you cannot simply apt install something and expect it to survive a reboot. Anything you want to add has to go in a container or in one of the writable data directories. If you are the kind of person who likes to tinker at the command line, that restriction will irritate you, and CasaOS on top of Debian gives you the freedom you want.
For a NAS, I would take ZimaOS every time. The read-only root is a feature rather than a limitation, because it makes the system much harder to break and much easier to recover. If you want a general-purpose Linux box that happens to run containers nicely, CasaOS is the better fit.
ZimaOS vs Unraid
Unraid is the obvious comparison, and the two systems solve the storage problem in different ways.
Unraid’s whole reason for existing is its array model. Each data disk is formatted independently and holds complete files, with one or two dedicated parity disks protecting the lot. You can mix a 4TB drive with a 12TB drive as long as your parity disk is at least as large as the biggest data drive, you can add disks one at a time without rebuilding anything, and if you lose more drives than your parity can cover you only lose the data on those specific disks. For anyone recycling a pile of mismatched drives, that is hard to beat.
ZimaOS uses conventional RAID. In the Combine dialogue, you get RAID 5 described as balanced, needing at least three disks and returning 66% or more of the raw capacity; RAID 1 described as safe, needing two disks and returning 50% or less; and JBOD as the flexible option. RAID 5 supports expansion, RAID 1 does not. Mixed capacity drives work, but the smallest drive dictates the usable capacity per member, so you waste space.
On the application side the gap is narrower than it used to be. Unraid has a large and mature community applications catalogue plus proper virtual machine support with GPU passthrough. ZimaOS ships with 146 apps in the official store on my install, plus community stores such as bigbeartechworld, and covers the usual suspects well. Unraid’s plug-in ecosystem is deeper, and its user share and cache drive handling is more sophisticated.
Where ZimaOS wins is approachability and cost. The interface is cleaner, the onboarding is far gentler, and it does not ask you to understand parity before you can store a file. Unraid remains the stronger choice if you have a stack of assorted drives or want serious virtualisation. ZimaOS is the better choice if you are building a two or four bay box with matched drives and want it working in twenty minutes.
ZimaOS Setup
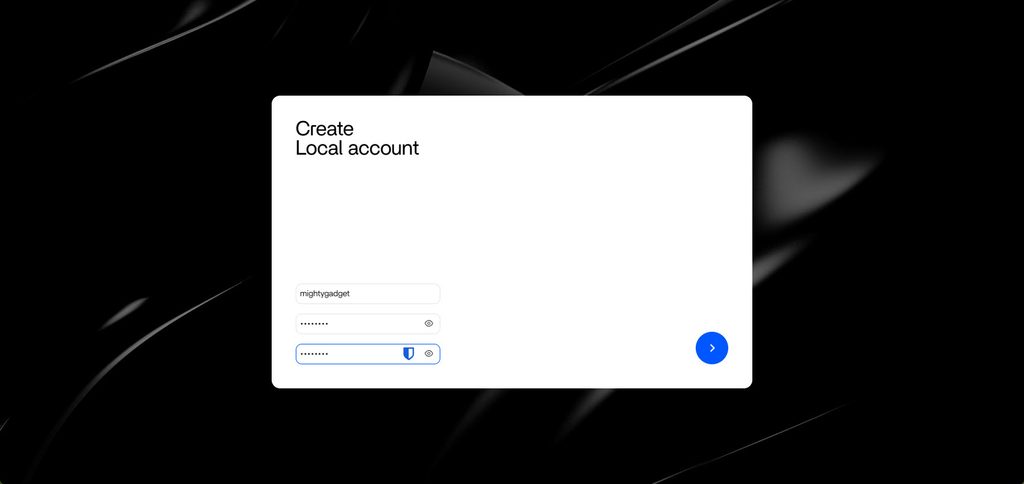
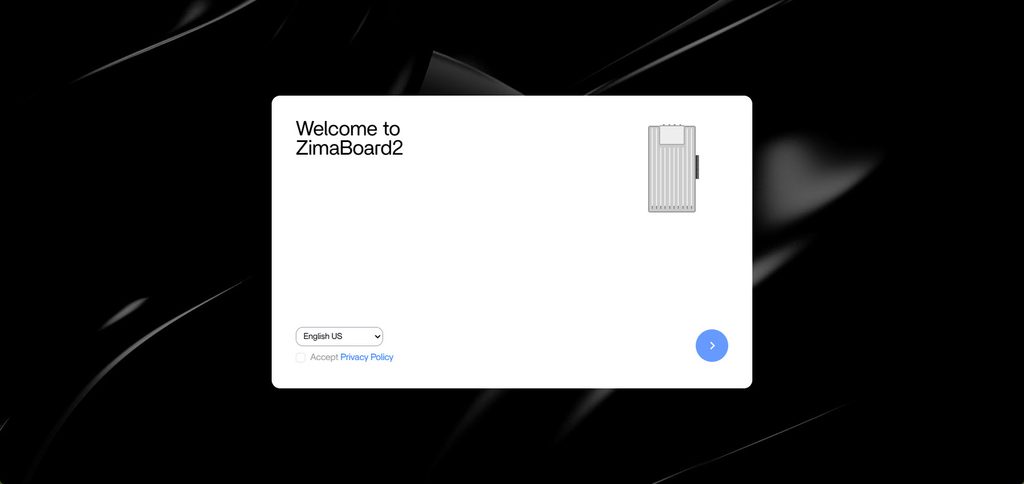
Setup is where ZimaOS makes its best case. You connect power and network, find the device on your network or plug in a display, and you are taken through a short web-based wizard.
The first screen welcomes you to the board, asks you to pick a language and accept the privacy policy. The second asks you to create a local account with a username and password. That is it. There is no cloud account requirement, no email verification and no forced sign-up, which is a welcome contrast to several of the mainstream NAS vendors who now push you towards an online account before you can do anything.
You then get a short introduction screen covering the four main ideas: combining hard drives with RAID 0, 1 or 5, managing data in Files, remote access through the Zima Client, and adding apps from the App Store. You can jump straight to Files, the App Store, or the dashboard.
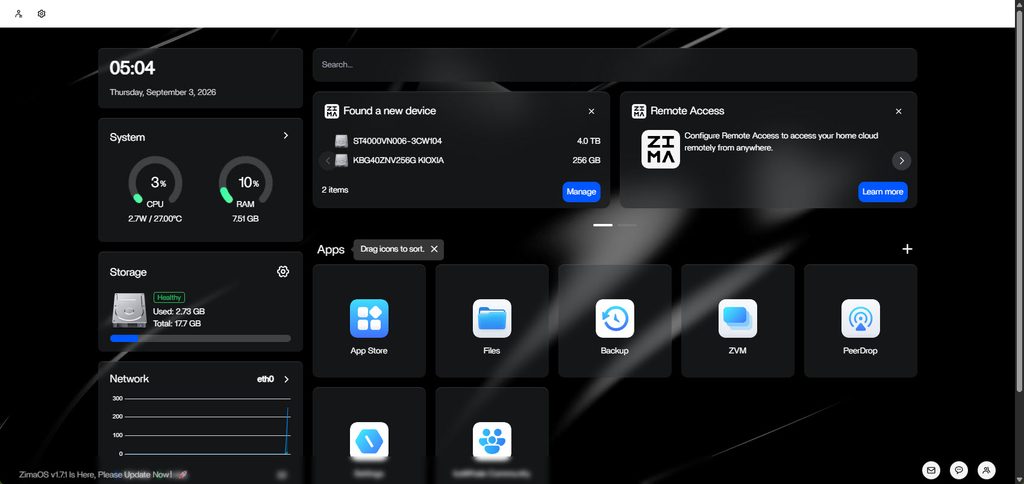
The dashboard itself is clean and dark by default. Down the left you get the clock and date, a system panel showing CPU and RAM use alongside package power draw and temperature, a storage summary with a health indicator, and a network graph. The main area carries notification cards and your app icons. When I attached my drives, a “Found a new device” card appeared listing the 4TB Seagate and the 256GB Kioxia NVMe with a Manage button, which is a sensible bit of design.
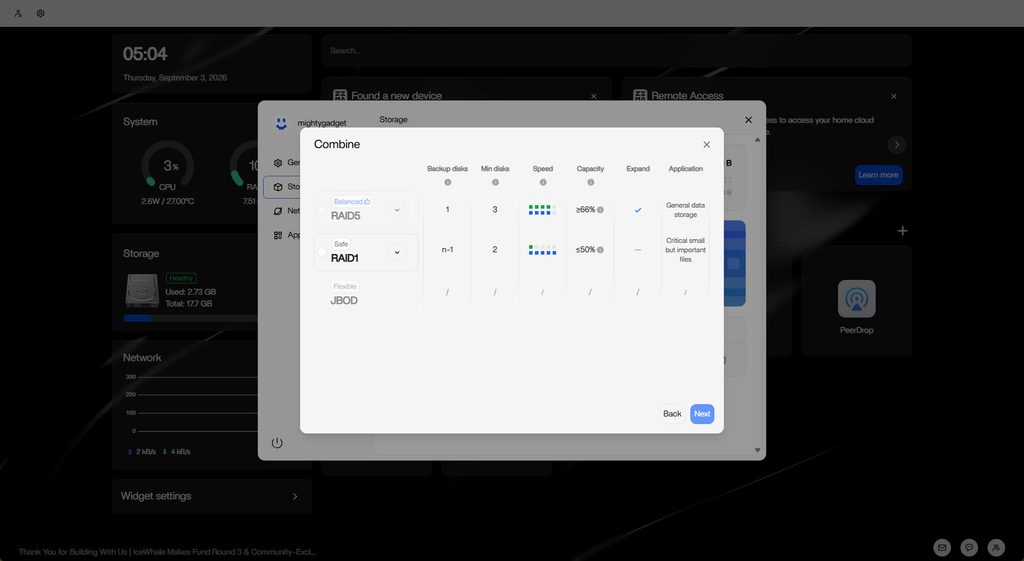
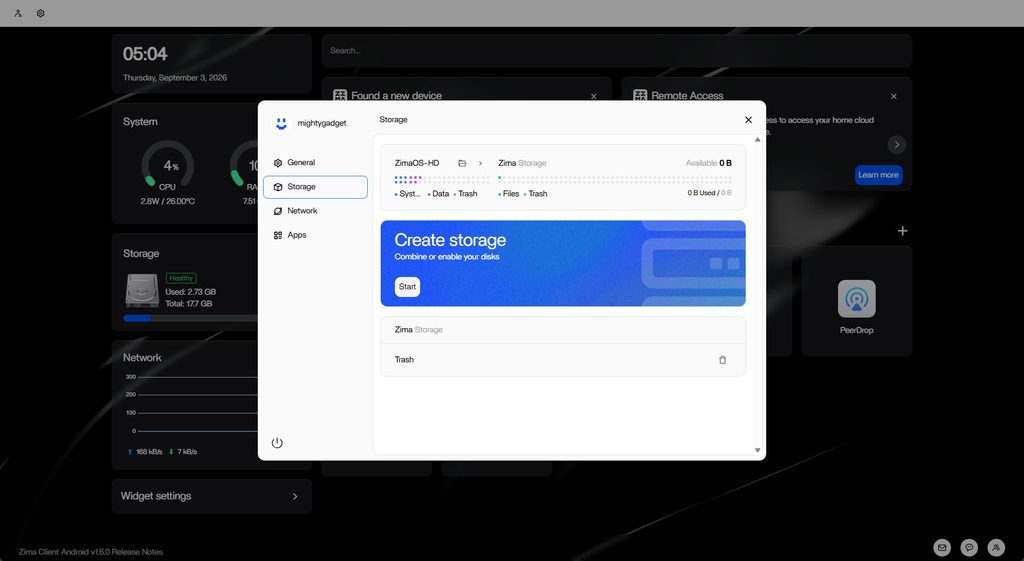
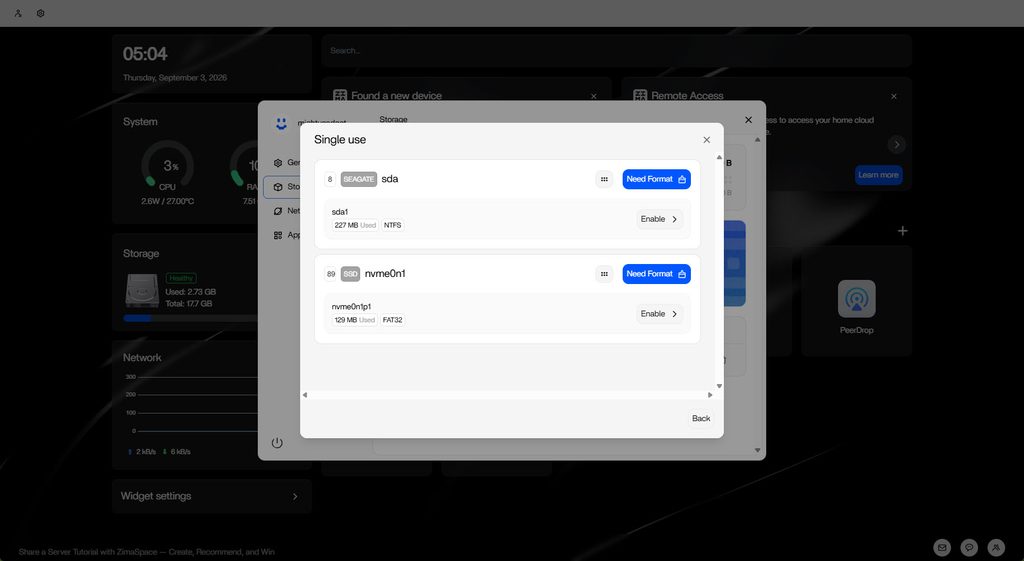
Storage configuration lives in Settings. The Create storage flow offers two paths. Single use presents each physical disk with its partitions and an Enable button, along with a Need Format warning if the existing filesystem is not supported. Combine takes you to the RAID selection screen described above. The whole process took me a couple of minutes, and afterwards the dashboard reported a 4.27TB pool in place of the previous 17.7GB eMMC volume.
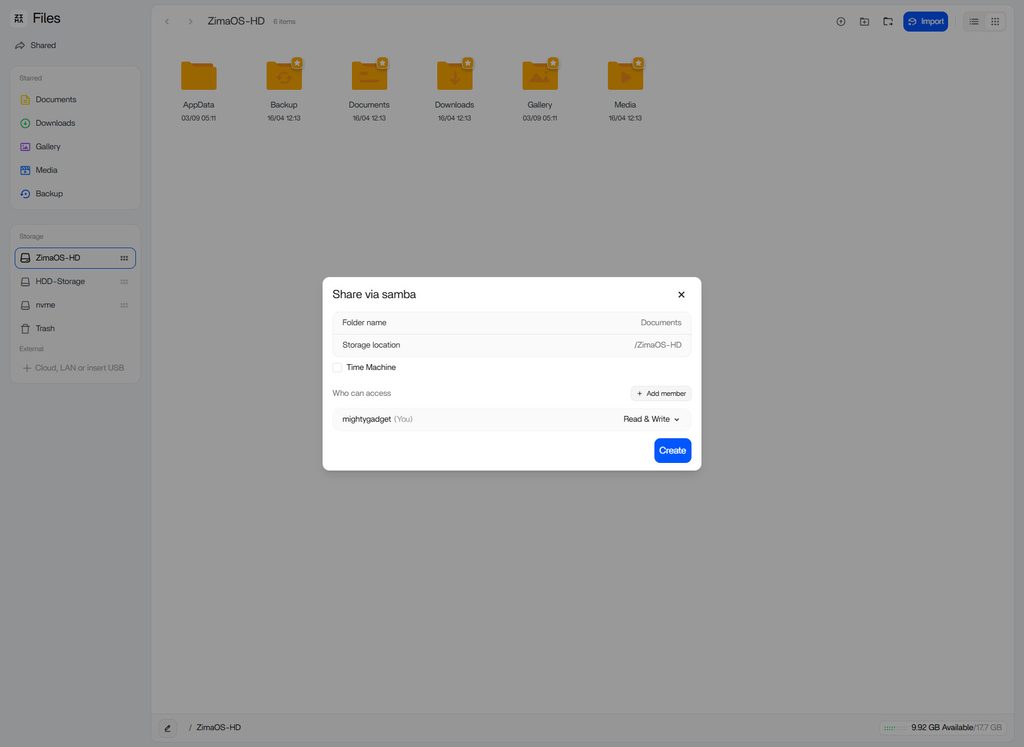
File sharing is equally straightforward. Right-clicking a folder in Files gives you Download, Copy path, Get info, Migrate, Copy, Duplicate, Cut, Rename, Star, Share via samba, Move to trash and Delete permanently. Choosing Share via samba opens a dialogue with the folder name, storage location, a Time Machine toggle for Mac backups, and a member list where each user gets Read Only or Read & Write. Once created, the Manage Share dialogue shows you the exact paths to paste into Windows Explorer and macOS Finder, with copy buttons next to each.
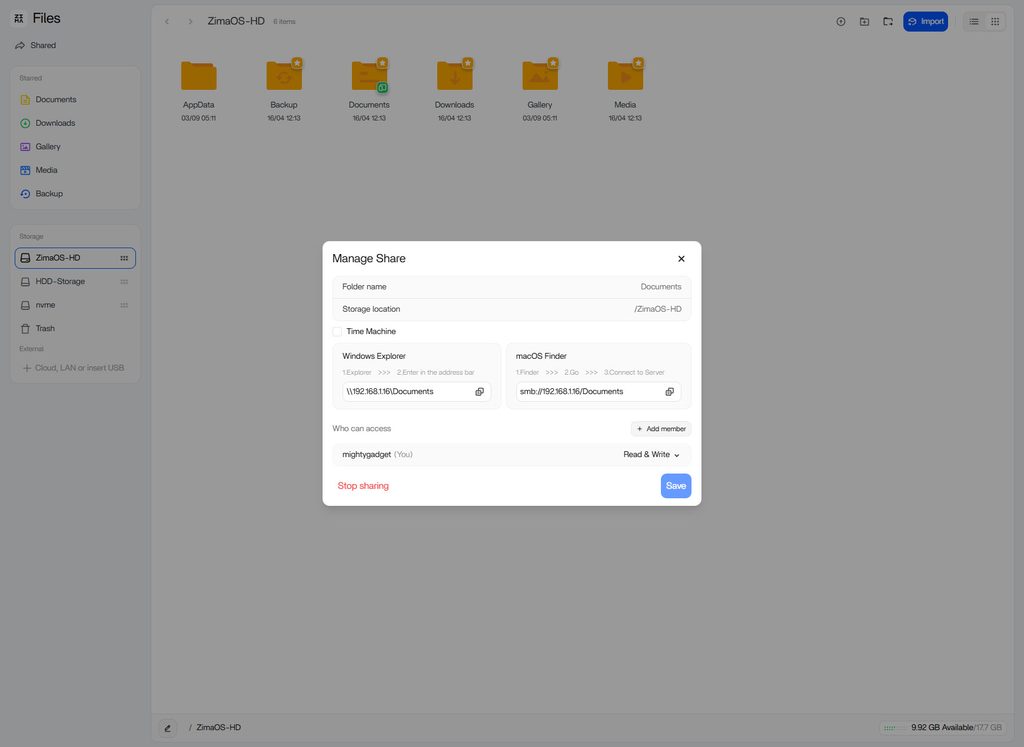
That last detail is a small thing, but it is the sort of small thing that separates good software from adequate software. Telling a non-technical user to type \\192.168.1.16\Documents, and giving them a button to copy it, removes the need to Google (or ask AI questions).
Zima Client for Desktop
The Zima Client is a small desktop application for Windows and macOS that does two jobs: it finds your ZimaOS device on the local network, and it establishes an encrypted peer-to-peer connection to it when you are away from home.
The headline feature is that it mounts your ZimaOS storage as a local disk. Rather than manually mapping a network drive, the client presents the device in Explorer or Finder and lets you work with the files as though they were attached to your machine. Over the local network this worked well and performance was indistinguishable from a standard SMB mount.
The remote access side is the more interesting part. ZimaOS sets up an encrypted peer-to-peer channel between the client and the device without any port forwarding, dynamic DNS or VPN configuration on your part. In my testing it connected reliably from outside the network without me touching my firewall. That is a real convenience, particularly for anyone who does not want to expose services to the internet or run their own VPN.
I do run Tailscale on mine as well, partly out of habit and partly because I want the same access method across everything in my home lab, and Tailscale is available as a one-click app in the ZimaOS store. If you are already running a mesh VPN, you may find the Zima Client redundant.
Two limitations are worth noting. There is no Linux client from IceWhale, which is an odd omission for a Linux-based NAS platform, although a community project exists. And ZimaOS prompts you to install the client fairly persistently in the Files interface, including a full-screen promotional panel the first time you open an empty folder. That gets old quickly.
Zima Client for Mobile
The mobile client covers Android and iOS, and the version I used identified itself as 1.6.x in the release notes banner on the dashboard.
Functionally it does what you expect. You get file browsing and upload, photo backup from the phone’s camera roll, and remote access through the same encrypted channel as the desktop client. Media files stream reasonably, and the app handles large uploads over mobile data without falling over.
The photo backup is the feature most people will use, and it works, though it is basic next to Immich or the Synology Photos app. It copies files to a folder rather than building an indexed library with face recognition and search. If photo management matters to you, install Immich from the app store and use its own mobile app instead. The Zima Client is better thought of as a file manager with backup attached than as a photo solution.
Performance on the phone is fine, the interface is clean and it mirrors the web UI closely enough that you are not learning two different products. It is not as polished as Synology’s mobile apps, which remain the benchmark, but it is well ahead of what TerraMaster and Ugreen were shipping when I last looked.
File Transfer Performance
The two 2.5GbE ports are the theoretical ceiling here, and the board gets very close to it. Using iperf3 between the ZimaBoard 2 and a wired client on my UniFi network, both ports returned around 2.35 Gbit/s in each direction, which is effectively line rate once you account for protocol overhead. Running traffic across both ports simultaneously did not cause any obvious CPU bottleneck, which is worth noting because some cheap 2.5GbE implementations fall apart under load.
Real-world SMB performance depends entirely on what you attach. With the 4TB Seagate IronWolf as the target, large sequential writes settled at around 150 MB/s and reads at around 170 MB/s, which is the drive’s limit rather than the network’s. Moving to the NVMe drive on the PCIe slot, large file transfers sat between 270 and 285 MB/s, which is close to the practical maximum for a 2.5GbE link.
Small file performance is a different story, as it always is with SMB. A folder of several thousand small documents dropped throughput to somewhere between 25 and 45 MB/s depending on file size distribution. That is normal behaviour and not a fault of the board, but it is worth knowing if you plan to sync large project folders rather than media files.
The onboard eMMC is the slowest link in the chain. Sequential reads of around 340 MB/s are respectable, but writes of around 200 MB/s and poor random performance make it unsuitable for anything write-heavy. Treat it as boot storage only, and put your app data and any database-backed services on SATA or NVMe.
One practical observation: if you are copying to a single mechanical drive, 2.5GbE is already more network than you need. The dual ports only pay off if you are using NVMe storage, running link aggregation, or serving several clients at once. Anyone planning to fill both SATA bays with spinning drives would get no benefit from the 5GbE on the TerraMaster F2-425 either.
General Performance
As a Docker host the N150 is more capable than its specification sheet suggests, largely because most self-hosted services spend their lives doing nothing.
My running configuration included Home Assistant, Immich, Plex, SABnzbd and Tailscale, which the App Store reported as five installed apps. At idle with all five running, the dashboard consistently showed CPU usage between 2% and 4% and RAM usage around 10% of the 7.51GB available to the system. That leaves a great deal of headroom, and I would be comfortable running twice that number of lightweight containers on the 8GB model.
RAM is the limit you will hit first rather than CPU. Eight gigabytes disappears quickly once you add anything with a database behind it, and because the memory is soldered you cannot do anything about it. Immich in particular is memory-hungry when it is running machine learning jobs on a photo library, and Home Assistant with a few integrations and a recorder database will take a steady bite. If you intend to run more than a handful of services, the 16GB model is worth the extra money.
Under sustained all-core load the picture changes. Running stress tests, the package temperature climbed into the low 90s Celsius and the CPU throttled back from its 3.6 GHz boost to around 2.3 to 2.5 GHz, where it stabilised. The chassis itself became genuinely hot to the touch. That is expected behaviour for a passively cooled 10 W part in an aluminium case, and it is the reason the NAS kit includes a fan. With the fan fitted, idle temperatures sat in the high 20s Celsius on my unit and sustained load temperatures stayed well clear of the throttling point.
For transcoding, the UHD Graphics 730 handles hardware decoding of H.264, HEVC, VP9 and AV1, and hardware encoding of H.264 and HEVC through Quick Sync. In practice that means one 4K HEVC to 1080p transcode runs comfortably, and two will usually work if the source bitrates are sensible. Software transcoding is not worth attempting on four efficiency cores.
Thermals and Noise
Without the fan, the ZimaBoard 2 is silent. The aluminium chassis handles idle and light loads without difficulty, and for a board running a few containers and serving files it will never become a problem.
With mechanical drives fitted, the noise equation changes anyway. My 4TB IronWolf is audible in a quiet room, and the supplied fan adds very little on top of that. In a cupboard or a rack it is a non-issue. On a desk beside you, the drives will bother you before the fan does.
The one configuration I would avoid is running the board passively inside an enclosed cabinet with sustained load. The heatsink relies on ambient airflow, and in a sealed space it will throttle. Fit the fan.
ZimaOS Apps and Features
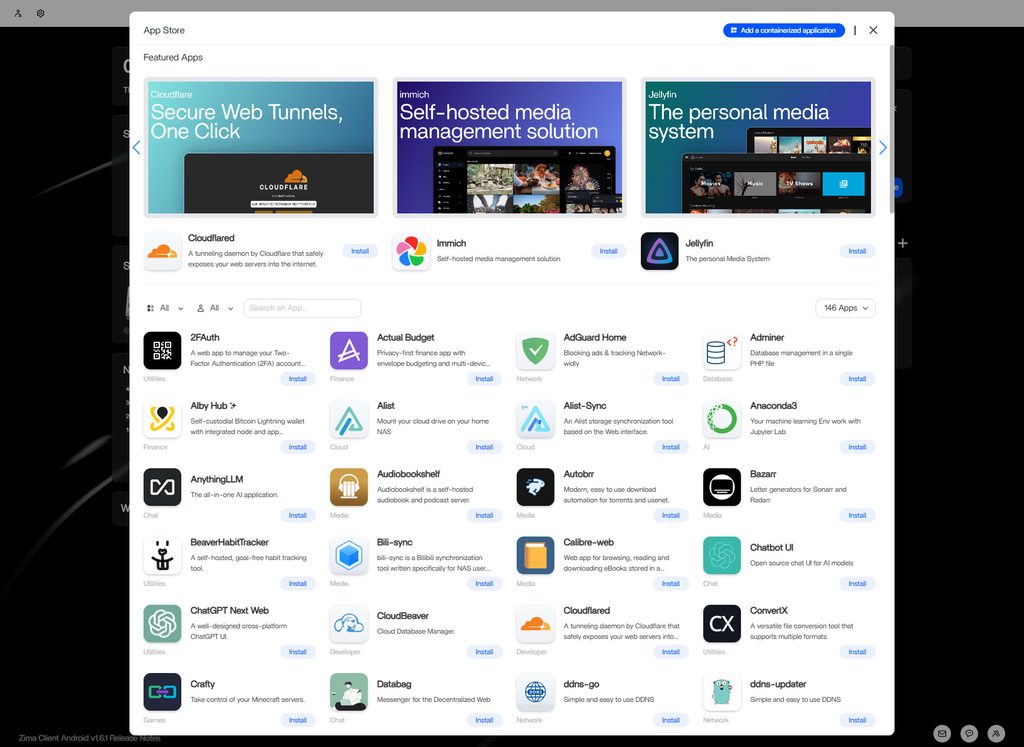
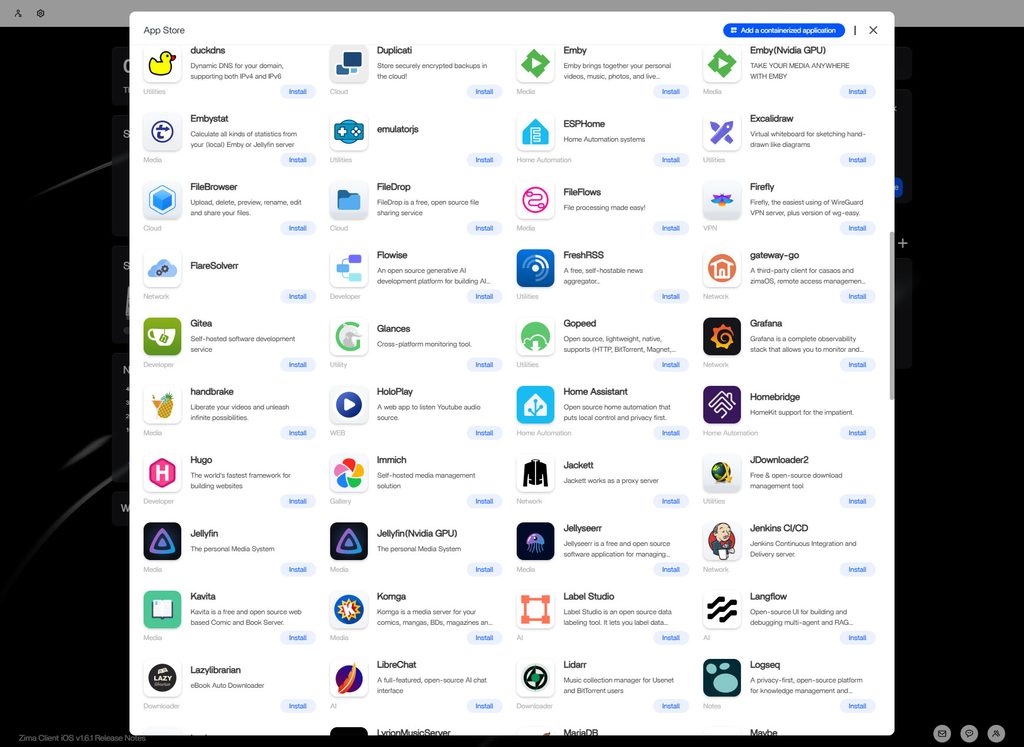
The App Store is the part of ZimaOS I have been most impressed with. My installation listed 146 applications in the official ZimaOS store, sorted into Media, Productivity, Home, Networking, AI, Finance, Social, Developer and Others, with a search box and a Discover section. You can also add community stores, and I added bigbeartechworld, which brings in a further substantial catalogue.
Installation is genuinely one click. Pick an app, press Install, and ZimaOS pulls the container, sets sensible defaults for ports and volumes, and adds an icon to your dashboard. There is an Install Custom App option for anything not in the store, which accepts a Docker Compose file, so you are not limited to the catalogue.
The Media category alone covers nzbfast, PodFetch, Audiobookshelf, Autobrr, Bazarr, Calibre-web, Deluge, Emby with and without Nvidia GPU support, Embystat, emulatorjs, FileFlows, Gopeed, HandBrake, Immich, Jackett, JDownloader2, Jellyfin, Jellyseerr, Kavita, Komga, Lazylibrarian, Lidarr and more. Elsewhere you get AdGuard Home, Actual Budget, AnythingLLM, Cloudflared, ESPHome, Excalidraw, FileBrowser, FreshRSS, Gitea, Glances, Grafana, Home Assistant, Homebridge, Jenkins, Label Studio, Langflow, LibreChat, Logseq, MariaDB and a long tail of others.
Updates are handled from a single My Apps screen with an Update all button, which is one of those quality of life details that Docker Compose users end up scripting themselves. My install had updates waiting for all five of my apps within a few weeks, so the catalogue is being maintained.
The main weakness is the same as any curated store: you are trusting IceWhale’s packaging. Some apps expose fewer configuration options than you would get running the container yourself, and if you need an unusual environment variable you will end up in the custom app route anyway.
Backup Tool
The Backup app handles three separate jobs, and it is worth separating them.
The first is backing up devices to the ZimaBoard. Time Machine support is built into the SMB share dialogue as a simple toggle, so turning a folder into a Mac backup target takes two clicks. Windows and phone backups run through the Zima Client.
The second is backing up the ZimaBoard itself to somewhere else. You can push data to cloud storage including Google Drive, Dropbox and OneDrive, or to another SMB target. I tested a scheduled job to another NAS on my network and it ran without issues.
The third is migrating in from an existing NAS. ZimaOS can connect to a Synology or other SMB source and pull data across, which lowers the barrier considerably if you are moving off another platform.
What is missing is versioned snapshot support of the kind ZFS gives you on TrueNAS. ZimaOS documentation mentions ZFS, but it was not exposed in the storage interface on my install, and the RAID options are all Btrfs or ext4 based. For protection against ransomware or accidental deletion, you are relying on a copy elsewhere rather than on local snapshots. That is a real gap compared with TrueNAS or Synology.
Downloads & Media Management
If you use Usenet or BitTorrent, everything you need is in the store. SABnzbd, nzbfast, Deluge, qBittorrent, Jackett, Autobrr, Gopeed and JDownloader2 are all one click away, and the full Sonarr and Radarr stack is available alongside Bazarr for subtitles and Jellyseerr for requests.
I ran SABnzbd on mine, and the N150 has more than enough performance for par2 repair and unpacking at full 2.5GbE download speeds. This was one of the areas where the board surprised me, because unpacking is genuinely CPU-intensive and I expected it to become a bottleneck. It did not.
The one thing to plan around is the eMMC. Download clients write constantly, and pointing an incomplete downloads folder at 32GB of eMMC is a good way to both fill it and wear it out. Put your download directories on SATA or NVMe storage from the outset.
Plex
Plex installs from the store and is configured through its usual web interface. Hardware transcoding through Quick Sync works, though you will need a Plex Pass to use it.
In use, direct play is effortless and hardware transcoding of a single 4K HEVC stream to 1080p ran without buffering. Two simultaneous transcodes worked with 1080p sources but became unreliable with two 4K sources at high bitrate. If you have a household that regularly watches several remote streams, you would want something with more graphics performance.
Jellyfin is also available, and since its hardware acceleration is free, it is worth considering if you are not already invested in Plex. Emby is there too, including builds with Nvidia GPU support, which is only relevant if you use the PCIe slot for a graphics card.
Plex’s library scanning and metadata work is where the eMMC shows its limits again. Keep the Plex application data directory on faster storage and the experience improves noticeably.
Immich
Immich is the self-hosted Google Photos alternative, and it is the app I would point most people towards if leaving a cloud photo service is the reason they are buying a NAS.
It installs in one click and its own mobile apps handle the camera roll backup properly, with automatic upload, background sync and the ability to free up space on the phone once files are safely stored. The web interface gives you a timeline, map view, albums, sharing and search.
The machine learning features are where the N150 struggles. Face recognition, object detection and smart search all run on the CPU here, and the initial indexing pass on a large library takes a long time. I would let it run overnight and not worry about it, since it is a one-off job, but do not expect the responsiveness you get from a machine with a discrete GPU. Once indexing is complete, day-to-day browsing and search are fine.
Memory is the other consideration. Immich’s machine learning container is the single hungriest thing I ran on the board, and on the 8GB model it is the main argument for stepping up to 16GB.
Home Assistant
Home Assistant is available as a one-click install, and given how much smart home kit I run, this was the app I was most interested in.
The container version installs cleanly and runs well. CPU usage is minimal, and the N150 handles a substantial number of integrations and automations without effort. The web interface is responsive and I saw no performance difference compared with running it on a dedicated mini PC.
The caveat is that this is Home Assistant Container, not Home Assistant Operating System, so you do not get the Add-on store. Things like Zigbee2MQTT, ESPHome, Mosquitto and Node-RED have to be installed as separate containers rather than as add-ons. ZimaOS does have ESPHome in its own store, and the others are all available as standard Docker images, so nothing is out of reach, but you are wiring it together yourself rather than pressing a button in the Home Assistant interface.
USB passthrough for Zigbee or Z-Wave sticks works, since the board has two USB 3.1 ports, but configuring it requires editing the container settings rather than a graphical toggle. If your smart home setup is already container-based you will find this familiar. If you are coming from Home Assistant on a Raspberry Pi with HAOS, it is a step backwards in convenience.
Alternatively, the ZVM virtual machine manager lets you run Home Assistant OS in a VM, which restores the add-on store at the cost of some memory overhead. On an 8GB board that is a tight fit alongside anything else.
NextCloud
Nextcloud is the obvious choice if you want a full file sync and collaboration platform rather than just SMB shares, and it is available in the store.
It works, and once running it gives you the familiar Nextcloud experience with file sync clients for every platform, calendar, contacts, and the Office document editing that makes it useful for anything beyond storage.
It is also the heaviest thing you can reasonably run on this hardware. Nextcloud wants a proper database, a PHP stack and a web server, and it benefits enormously from Redis caching. On an N150 with 8GB, it is usable but not fast, and the web interface can feel sluggish when several users are active. Put the data directory and the database on NVMe rather than eMMC and it improves considerably.
For most people, the combination of SMB shares for bulk storage, Immich for photos and the Zima Client for remote access covers what Nextcloud would do, with far less overhead. I would only install Nextcloud here if you actually need the document collaboration or the groupware features.
Virtual Machines with ZVM
ZVM is the built-in virtual machine manager, and its presence on a device at this price is notable. The N150 supports both VT-x and VT-d, so hardware virtualisation and device passthrough are available.
In practice it is best used sparingly. Four efficiency cores and 8GB of RAM do not leave much room for a virtual machine alongside your containers, and the interface is simple compared with Proxmox, which is what I use for virtualisation elsewhere. It is there if you need a Windows VM for one specific task, or if you want Home Assistant OS with its add-on store, but I would not buy this board planning to run several VMs.
PeerDrop sits alongside it on the dashboard and handles direct peer-to-peer file transfers between devices, similar to AirDrop or LocalSend. It is a small feature but a genuinely useful one for moving a file to a phone without setting up a share.
Power Draw
Power consumption is the reason to buy a machine like this rather than repurposing an old desktop, so it is worth being precise about what I measured.
The ZimaOS dashboard reports CPU package power directly, and at idle with my five apps running it sat between 2.6 W and 2.8 W, with a reported temperature of 26 to 29C with the fan fitted. That figure is the processor package only, not the whole system.
At the wall, the board alone with only the eMMC drew a little under 10 W at idle. Adding the 256GB NVMe drive pushed that to around 11 W. Adding the 4TB IronWolf took idle consumption to roughly 21 to 23 W with the drive spinning, which is entirely the drive’s contribution rather than the board’s.
Under load the numbers stay modest. Sustained CPU stress took the whole system to around 25 W without drives attached, and peak draw during simultaneous drive spin-up and CPU load reached the high 30s. The supplied 60 W power supply on the NAS kit has plenty of margin.
To put that in context, at an electricity rate of 25p per kWh, running the board with a single mechanical drive at around 22 W continuously costs roughly £48 a year. Running it as a diskless container host at 10 W costs around £22 a year. Those are figures I am comfortable with for an always-on device, and they compare well with the 30 to 40 W that a repurposed desktop would typically draw doing the same work.
Spinning down idle drives will reduce that further, though ZimaOS does not expose drive spin-down timing as prominently as Synology’s DSM does.
Price and Alternative Options
You can buy directly from zimaspace.com or Amazon UK / Amazon US.
On zimaspace.com, pricing is as follows:
- ZimaBoard 2 Board Only / 8GB RAM / 32GB eMMC Storage – $339
- ZimaBoard 2 Board Only / 16GB RAM / 64GB eMMC Storage – $399
- ZimaBoard 2 Starter Bundle / 8GB RAM / 32GB eMMC Storage – $399 / $379
- ZimaBoard 2 Starter Bundle / 16GB RAM / 64GB eMMC Storage – $459.00 / $449.00
- ZimaBoard 2 Mini NAS Kit / 8GB RAM / 32GB eMMC Storage – $469.00 / $449.00
- ZimaBoard 2 Mini NAS Kit / 16GB RAM / 64GB eMMC Storage – $529.00 / $519.00
Based on the ZimaBoard 2 Mini NAS Kit / 8GB RAM / 32GB kit I was sent, the UK price would be £353, which is £40 cheaper than the Amazon UK price, though, in theory, you should pay import fees (I doubt this will happen).
On Amazon UK, the pricing is:
- ZimaBoard 2 8GB – £320
- ZimaBoard 2 16GB – £391
- ZimaBoard 2 8GB Mini NAS – £393
- ZimaBoard 2 16GB Mini NAS – £455
If you only get the board only, you can later add the other bits:
- HDD Tray – £50
- ZimaBoard Dual M.2 NVME SSD Adapter – £22
- ZimaBoard SATA Y-Cable ZimaBlade – £13
Competing NAS options include:
- Beelink ME Pro 2 – N150 / 16GB / 1TB SSD / Supports 3x M.2 + 2×3.5in – £419
- Terramaster F2-425 – N150 / 8GB / 5GbE / Supports 2x M.2 + 2×3.5in – £332
- UGREEN NASync DXP2800 GT – AMD Ryzen Embedded R2514 / 10GbE / 2x M.2 + 2×3.5in – £413
Value for Money
Based on the above options, the ZimaBoard 2 Mini NAS Kit costs more than the TerraMaster F2-425, has slower 2.5GbE, and requires you to assemble the NAS.
The ZimaBoard does have some advantages, though. ZimaOS is superior to TOS, and I would say it’s better than the Ugreen UGOS as well. There are far more apps to install, and the UI is much nicer.
You can install UNRAID, or even ZimaOS, on the above options, but ZimaOS will set you back another $30, or UNRAID is $49 but only includes one year of updates now.
The ZimaBoard 2 also has the advantage of being able to use the PCIe port; if you use the Dual M.2 NVME SSD, it gives you the same storage options as above, but you could add a GPU, which gives it a lot more versatility.
If you are comfortable installing your own OS, I would say that the alternative options are better overall, but I think ZimaBoard 2 has a certain appeal to it and is a good option for people who like to tinker with things.
The Beelink ME Pro 2 is the one that makes the ZimaBoard 2 look expensive on paper. For £419 you get the same N150, double the RAM, a 1TB SSD included, and three M.2 slots in a considerably more finished enclosure. What it does not give you is the PCIe slot, and its M.2 slots run at reduced lane counts. The TerraMaster F2-425 undercuts everything at £332 with 5GbE networking, which is the better choice if raw file serving speed is your priority and you intend to replace TOS with something else.
The UGREEN DXP2800 GT is the most complete package of the three alternatives, and its AMD Ryzen Embedded chip is substantially more capable than the N150 for transcoding and virtualisation. UGOS has improved considerably, though I still find its app catalogue thin next to the ZimaOS store.
Where the ZimaBoard 2 justifies itself is in the flexibility of that PCIe slot and the quality of ZimaOS. If neither of those matters to you, one of the alternatives will serve you better for less money.
Pros and Cons
What I liked:
- ZimaOS is the best simplified NAS operating system I have used, with a genuinely good app store
- PCIe 3.0 x4 slot for NVMe, 10GbE or a low profile GPU, which nothing else at this price offers
- Dual 2.5GbE ports that both hit close to line rate
- Low idle power draw of under 10 W for the board itself
- Solid aluminium chassis with fanless operation in its standard form
- No cloud account required during setup
- ZimaOS+ licence included with the hardware
What could be better:
- No assembly instructions at all with the Mini NAS Kit, which is inexcusable
- Soldered RAM means 8GB is a permanent limit on the cheaper model
- 32GB of eMMC leaves only about 17.7GB usable
- Mini DisplayPort rather than HDMI
- Thermal throttling under sustained load without the fan fitted
- No snapshot support and limited account security options in ZimaOS
- More expensive than better specified alternatives such as the TerraMaster F2-425
Overall
My overall opinion is a bit mixed, as this is essentially two reviews: one for ZimaOS, which I think is superb, and another for the hardware, which I think is OK.
ZimaOS is the part I would recommend without hesitation. It manages the difficult trick of being simple enough for someone who has never run a server while still giving experienced users Docker Compose imports, SSH access and a virtual machine manager. The app store is broad, the storage management is clear, and the remote access works without any network configuration. Placed alongside TerraMaster’s TOS or Ugreen’s UGOS, it is the better product, and at $29 for a lifetime licence it is considerably cheaper than Unraid.
The hardware is harder to be enthusiastic about. It is well made, the port selection is thoughtful, and the PCIe slot gives it a flexibility that nothing else in this price bracket can match. Against that, the soldered memory, the small eMMC, the missing instructions and the price relative to more complete alternatives all count against it.
If you want a finished NAS that works out of the box, buy a TerraMaster or a Ugreen and be done with it. If you want a small, low-power, expandable x86 server that you can point at whatever project takes your interest, and you value software that stays out of your way, the ZimaBoard 2 makes a reasonable case for itself. I would buy the 16GB model rather than the 8GB one, and I would budget for an NVMe drive on day one.
ZimaBoard 2 Review
-
ZimaOS - 90%90%
-
Hardware - 80%80%
-
Value for Money - 70%70%
Summary
I found the ZimaBoard 2 a capable, flexible home server, but ZimaOS is its strongest feature. The straightforward interface and extensive app support make running a NAS and Docker containers accessible, while dual 2.5GbE ports, PCIe expansion and low power consumption give the hardware practical appeal. However, limited eMMC storage, non-upgradeable RAM and missing assembly instructions detract from the package, particularly when competing NAS systems offer better specifications for less money. It suits enthusiasts who value flexibility, but I would choose the 16GB model and budget for additional storage.
Pros
- Straightforward ZimaOS interface
- Extensive app support
- Flexible PCIe exp
- Straightforward ZimaOS interface
- Extensive app support
- Flexible PCIe expansion
- Dual 2.5GbE networking
- Low power consumptio
- ansion
- Dual 2.5GbE networking
- Low power consumption
Cons
- Better-value alternatives available
- No assembly instructions
- RAM cannot be upgraded
- Limited onboard storage
- No native snapshot support

I am James, a UK-based tech enthusiast and the Editor and Owner of Mighty Gadget, which I’ve proudly run since 2007. Passionate about all things technology, my expertise spans from computers and networking to mobile, wearables, and smart home devices.
As a fitness fanatic who loves running and cycling, I also have a keen interest in fitness-related technology, and I take every opportunity to cover this niche on my blog. My diverse interests allow me to bring a unique perspective to tech blogging, merging lifestyle, fitness, and the latest tech trends.
In my academic pursuits, I earned a BSc in Information Systems Design from UCLAN, before advancing my learning with a Master’s Degree in Computing.
I’m proud to share that Vuelio has consistently ranked Mighty Gadget as one of the top technology blogs in the UK. With my dedication to technology and drive to share my insights, I aim to continue providing my readers with engaging and informative content.
I work directly with the companies he reviews products for or their chosen PR agency.
For Social Media, you can find me on: