When the
iPhone 7 plus was announced with it’s dual camera, one of the features Apple focused on was a new portrait mode. This purpose of this feature was to give you
great pictures and a depth of field effect, similar to what you get in a higher-end camera like a DSLR.
The problem is that this didn’t ship with the iPhone but now the iOS 10.1 has been released, it comes with the portrait feature.
How to access portrait mode
So to access this:
- You go into the camera app
- Select from the bottom the portrait mode (this is added to the other modes that are in the camera)
- Once in this mode, the camera switches to the 56 millimetre telephoto lens and this is what you will use to take the images
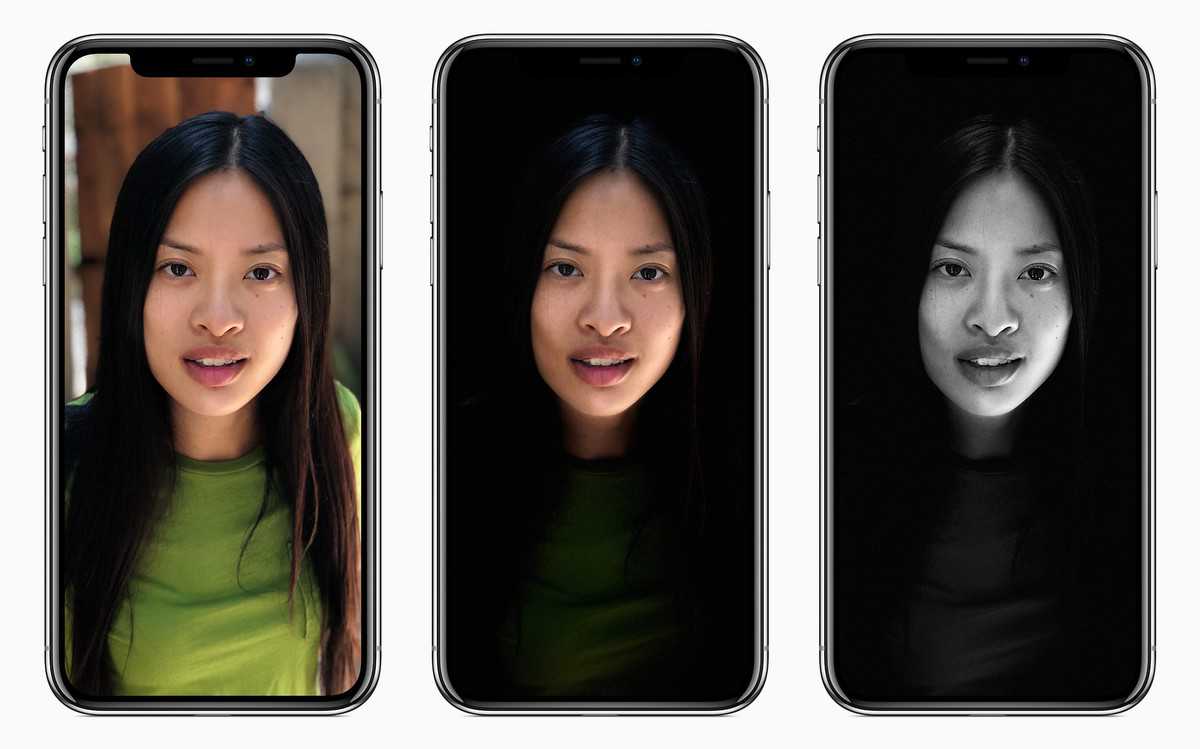
In order to get the effect you want where you have the separation of the foreground and background, in a camera this small, Apple is using two cameras to gather data and create a depth map. There’s a lot of work going into this like using
facial recognition and using the slight differences in what the two cameras see.
The different levels in the depth map are then used to apply a blur and this will allow for a more gradual and changing blur rather than a single stagnate blur applied across the entire background, at least that’s the hope.
Using portrait mode
So to test this, you want to set up a scene with a subject and a few items in the background just to see how the blur differentiates. So when using the portrait mode, it works much the same as any other picture mode but there are a few caveats. One: your subject has to be in the right place. You can’t be too close or too far otherwise it’s not going to work. But once you’re in the correct position, the depth effect is actually rendered on the screen in real-time so you can see a preview of what it’s going to look like when you take the photo.
- So you just go into the camera app
- You can tap to focus like normal It’ll lock in and you can see the depth effect
- Go ahead and take a photo and then it renders out
It also has the normal version without the depth effects saved so you can compare them and see how they look. If the objects in the background are farther back, it will appear a little bit more blurry.
This feature works best with people because it can use facial recognition, it doesn’t only have to work with faces because you can also use it with objects and it should still work although it might not be quite as good, at least not yet. So if you take a picture of the object, you still get the depth effect even though it’s not a person. You can definitely tell that there’s a difference between the normal photo and the one with a
depth effect.
With this feature, it really depends what situation you’re shooting in when you want to capture a good photo. When you compare it to a photo taken with a bigger sensor and an actual depth of field instead of one that is simulated, you can see where the differences are and where more work definitely needs to be done. One of the places where you definitely see the difference is around the subject, you get this kind of halo effect and that occurs because of the blur. If you’ve ever tried to apply and blur to a background in Photoshop, and you cut out your subject, you’ll notice you’ll get the same type of blur.
When you look at the photo coming from a dedicated camera you don’t get that. it looks a lot more natural. Plus, in a dedicated camera, there’s not a limit to the number of layers you can have when applying these depth blurs, it’s just all throughout the range you get that blur.

I am James, a UK-based tech enthusiast and the Editor and Owner of Mighty Gadget, which I’ve proudly run since 2007. Passionate about all things technology, my expertise spans from computers and networking to mobile, wearables, and smart home devices.
As a fitness fanatic who loves running and cycling, I also have a keen interest in fitness-related technology, and I take every opportunity to cover this niche on my blog. My diverse interests allow me to bring a unique perspective to tech blogging, merging lifestyle, fitness, and the latest tech trends.
In my academic pursuits, I earned a BSc in Information Systems Design from UCLAN, before advancing my learning with a Master’s Degree in Computing.
I’m proud to share that Vuelio has consistently ranked Mighty Gadget as one of the top technology blogs in the UK. With my dedication to technology and drive to share my insights, I aim to continue providing my readers with engaging and informative content.
I work directly with the companies he reviews products for or their chosen PR agency.
For Social Media, you can find me on:
Twitter/X – Instagram – Facebook – LinkedIn – Strava